By: CS2103AUG2017 T16-B2 Since: Sep 2017 Licence: MIT
- 1. Introduction
- 2. About
- 3. Setting Up and Getting Started
- 4. Layout
- 5. Features
- 5.1. Student Management Features
- 5.1.1. Adding a person:
addSince v1.0 - 5.1.2. Editing a person :
editSince v1.0 - 5.1.3. Deleting a person :
deleteSince v1.0 - 5.1.4. Overwrites a remark to a person :
remarkSince v1.2 - 5.1.5. Selecting a person :
selectSince v1.0 - 5.1.6. Locating persons by name:
findSince v1.0 - 5.1.7. Locating persons by tags:
findtagsSince v1.1 - 5.1.8. Listing all persons :
listSince v1.0 - 5.1.9. Sorting all persons :
sortSince v1.2 - 5.1.10. Clearing all entries :
clearSince v1.0
- 5.1.1. Adding a person:
- 5.2. Schedule Management Features
- 5.3. User Interface Features
- 5.4. General Features
- 5.1. Student Management Features
- 6. Command Shortcuts
- 7. FAQ
- 8. Glossary
- 9. Patch Notes
1. Introduction
cherBook is an application specifically designed to help teachers keep up with their hectic schedule and monitor students' academic progress.
Need to do reports on students' academic progress and help students lagging behind?
No worries, `cherBook’s data analysis helps you find trends in student’s academic development and identify students that need extra help.
For teachers and educators like you who often have countless meetings and consultations every week, we also have you covered.
`cherBook’s scheduling feature allows you to keep track of your dates and times easily within seconds.
cherBook v1.5 is available for the Linux, Unix and Windows and Mac OS X operating systems
2. About
This user guide helps you set up and get started with cherBook v1.4.
The user guide includes an overview of the features in cherBook v1.4
and demonstrates how to use them with the help of examples.
Some statistical concepts will be used in the explanations of the features cherBook v1.4.
However, you will not need prior technical knowledge understand this user guide.
Statistical concepts such as averages , percentiles and standard deviations --- will be explained in the the Glossary below.
3. Setting Up and Getting Started
-
Ensure you have Java version
1.8.0_60or later versions installed on your Computer.Having any Java 8 version is not enough.
This app will not work with earlier versions of Java 8. -
Download the latest
cherBook.jarhere. -
Copy the file to the folder you want to use as the home folder for your Address Book.
-
Double-click the file to start the app. The GUI should appear in a few seconds.
-
This is your homepage.
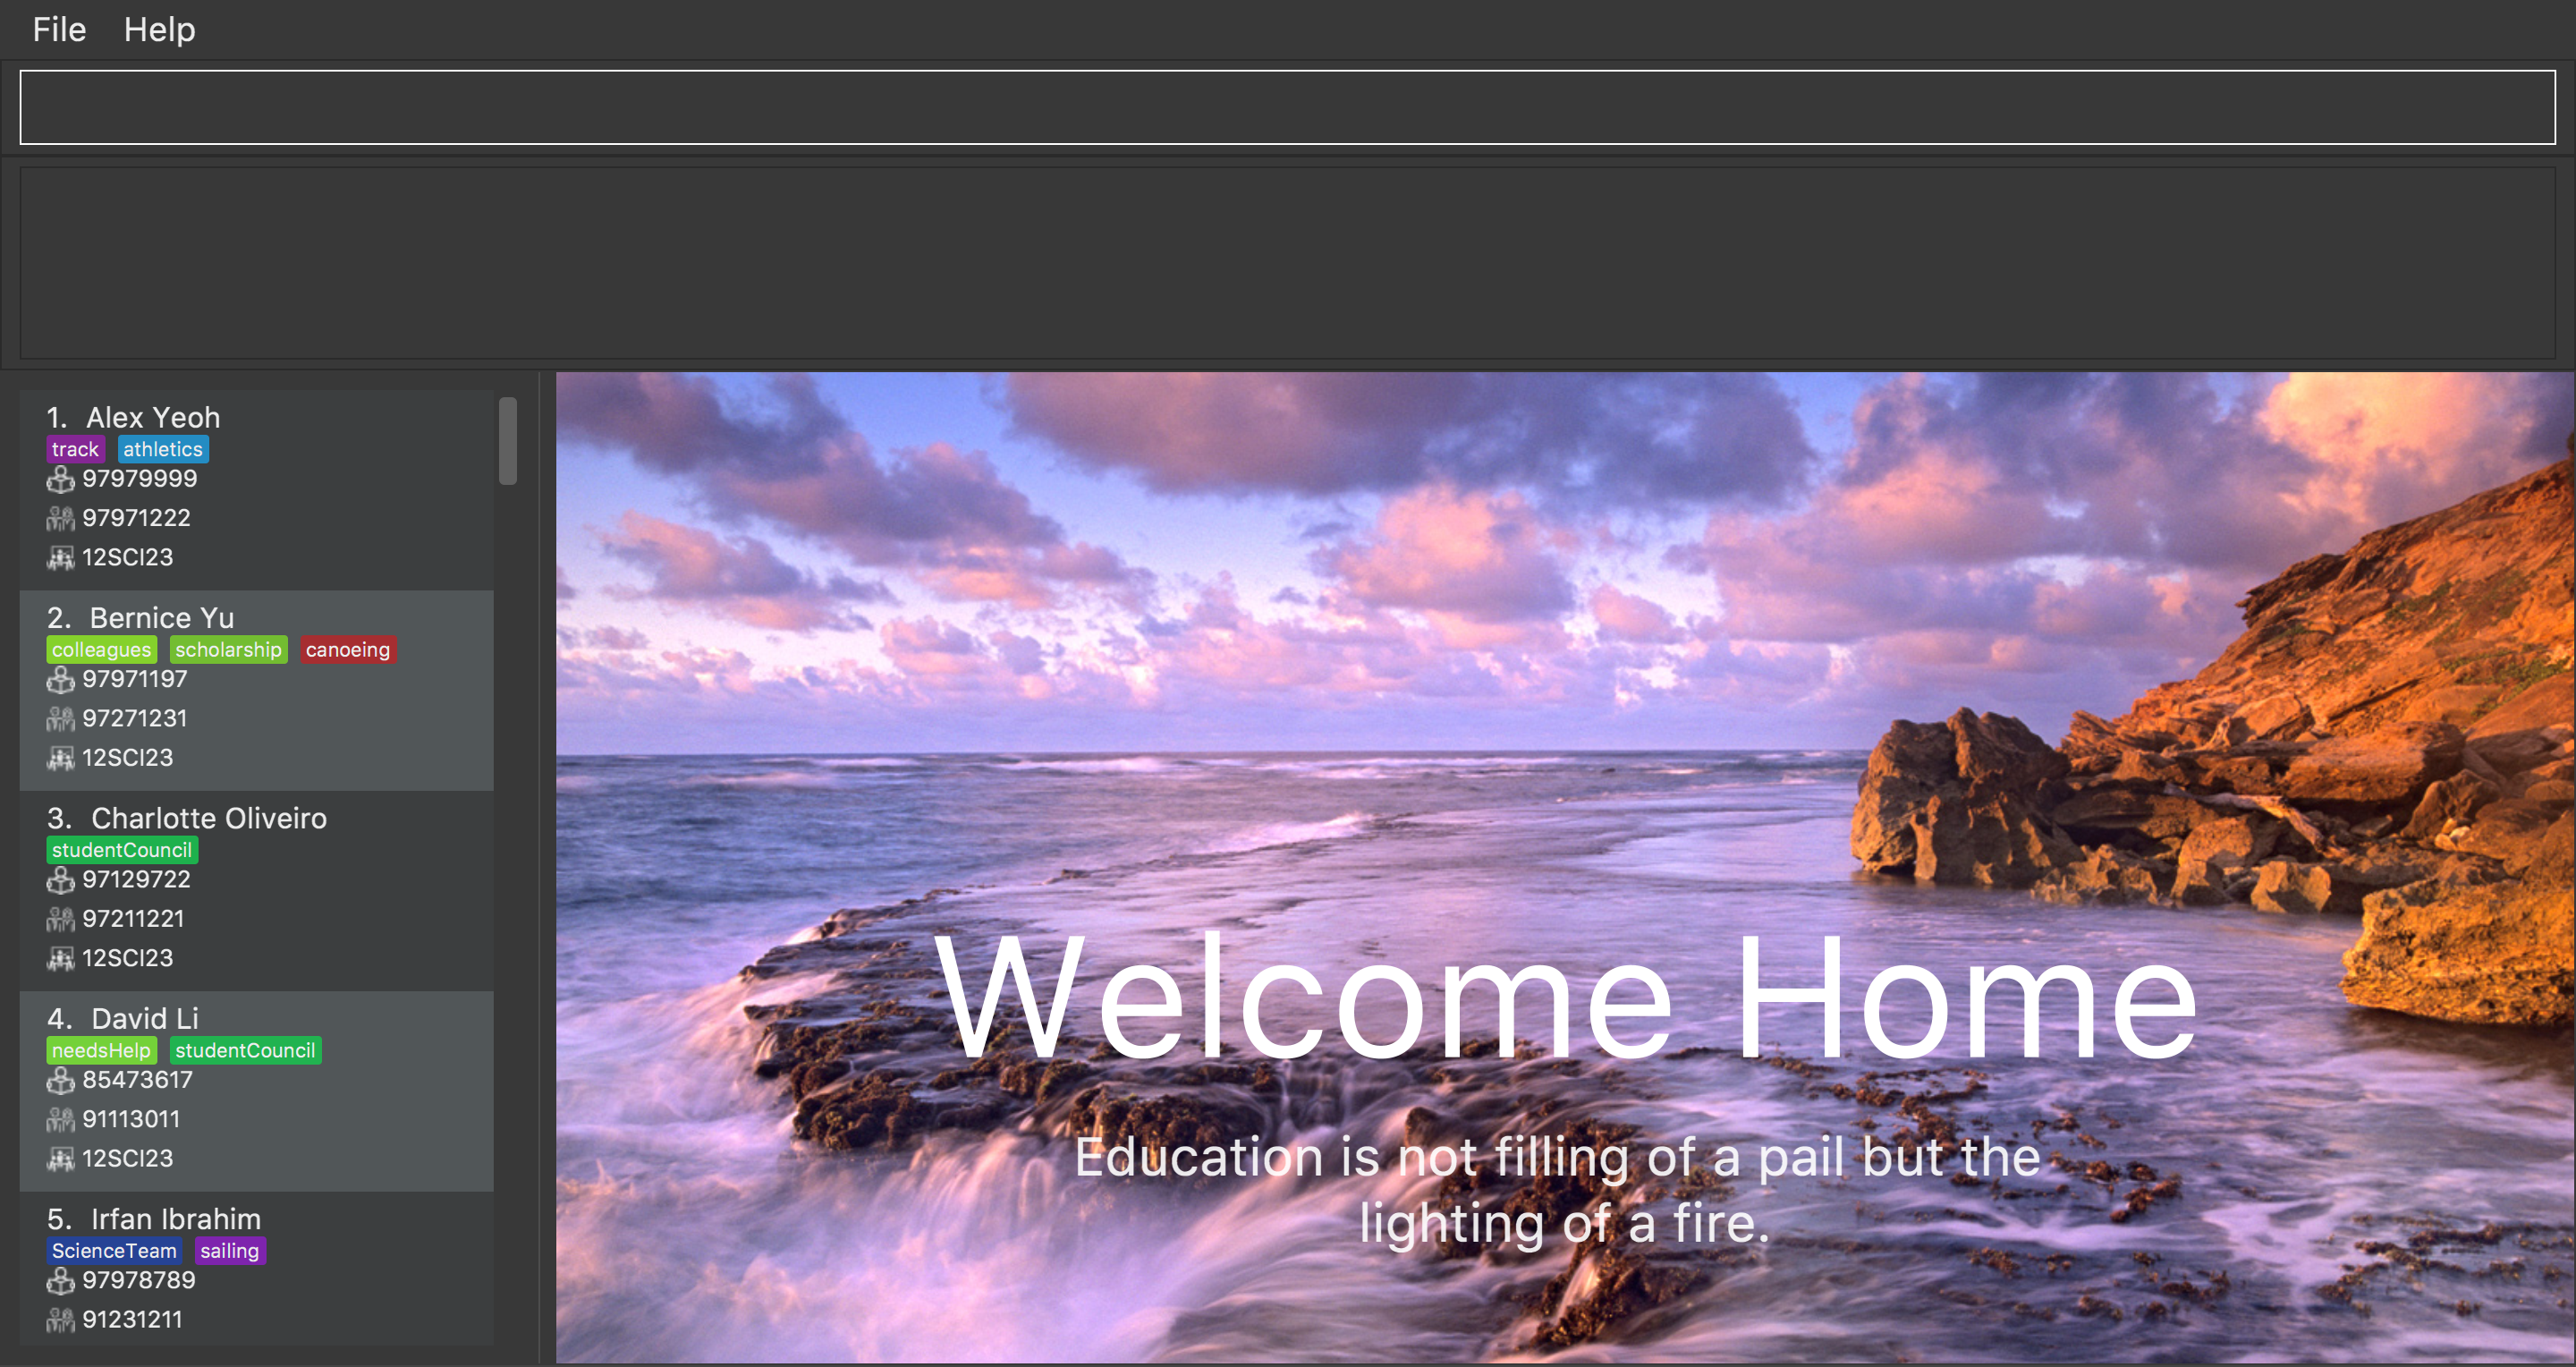
Figure 3.1 : cherBook’s home page
-
Type the command
select 1in the command box and press Enter to to go to access the switch out of the Home Page.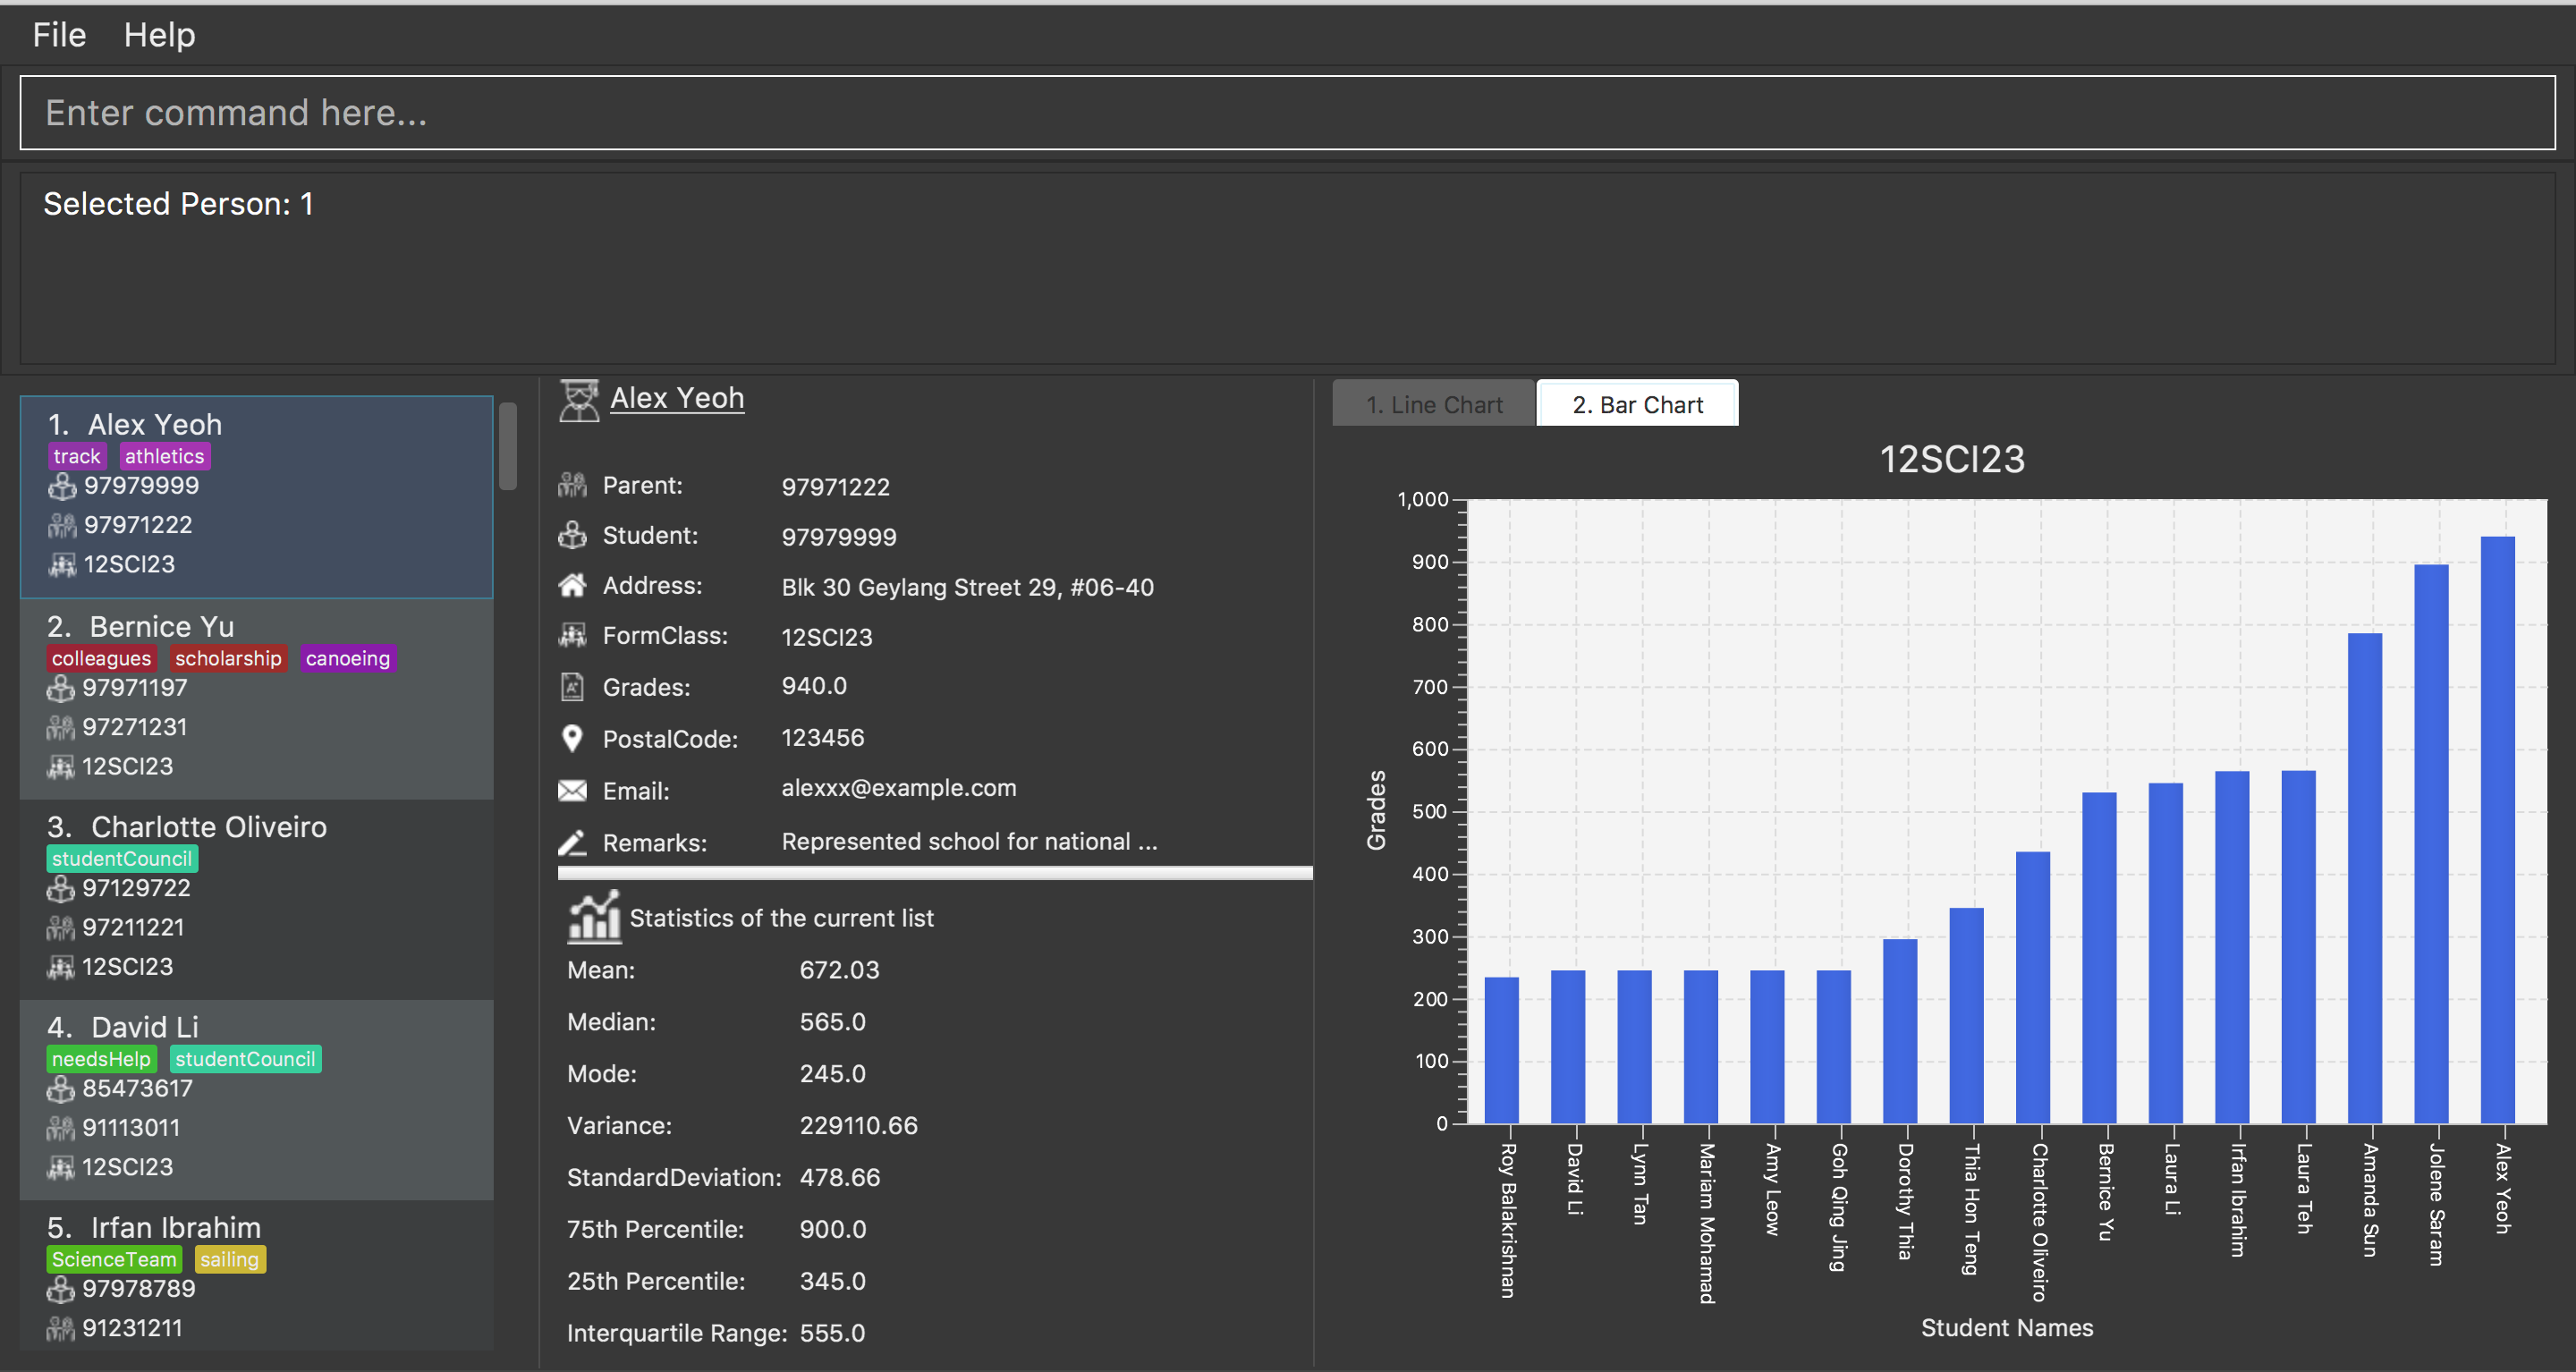
Figure 3.2 : cherBook’s application page
-
Type the command in the command box and press Enter to execute it.
e.g. typinghelpand pressing Enter will open the help window. -
Some example commands you can try:
-
list: lists all contacts -
addn/John Doe p/98765432 pp/97272011 e/johnd@example.com a/John street, block 123, #01-01 f/12S23 g/123.0 c/673349: adds a contact namedJohn Doeto cherBook. -
sort: sorts all contactsalphabeticallyby name. -
findtagsscholarship: lists contacts with thescholarshiptag -
viewschedules:displaysyour schedules inside the command box. -
tab2: switches tobarchart -
delete3: deletes the3rdcontact shown in the current list -
exit: exits the app
-
-
You can refer to the Features section below for more details of each command.
4. Layout
The following image highlights cherBook’s User Interface and its 6 components.
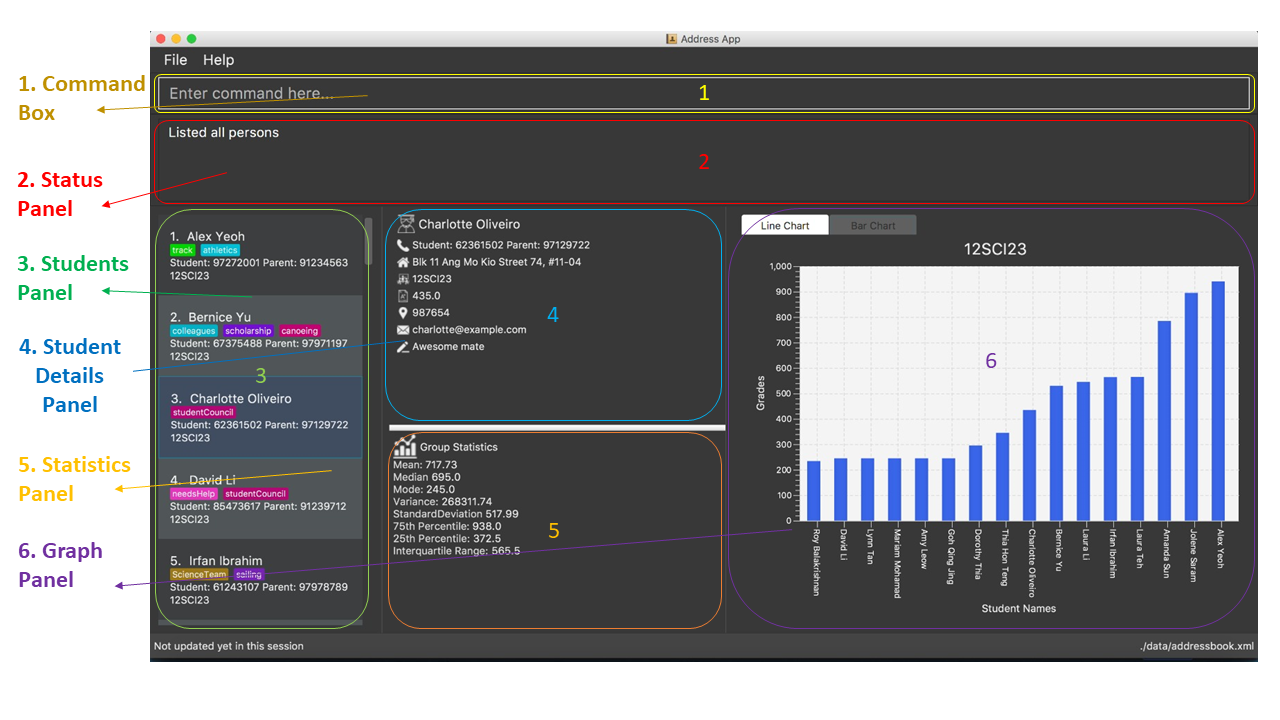
Figure 4.1 : cherBook’s User Interface layout
Here’s how you can use them:
-
Command Box
-
Type your desired command into the
Command boxand press Enter to execute them. e.g. typinghelpand pressing Enter will open the help window.
-
-
Status Panel
-
The
Status Paneldisplays the results of your latest command.
-
-
Home Panel
-
The
Home Panelis only displayed when you start up cherBook or when you type thehomecommand. It would be switched between the Student Details Panel, Statistics Panel and Graph Panel when you use aselectcommand.
-
-
Students Panel
-
The
Students Panelcontains a list of all the students in cherBook. You can enter commands likefind,findtagsandsortto narrow down the list of students in this panel.
-
-
Student Details Panel
-
The
Student Details Paneldisplays the contact information of the currently selected student. You can select the student using theselectcommand.
-
-
Statistics Panel
-
The
Statistics Paneldisplays the relevant statistics for the current list of students in theStudents Panel.
-
-
Graphs Panel
-
The
Graph Paneldisplays either a line or bar chart containing grades of students in the currently selected student’s class.
-
5. Features
5.1. Student Management Features
Command Format
-
Words in
UPPER_CASEare the parameters to be supplied by the user e.g. inadd n/NAME,NAMEis a parameter which can be used asadd n/John Doe. -
Items in square brackets are optional e.g
n/NAME [t/TAG]can be used asn/John Doe t/friendor asn/John Doe. -
Items with
… after them can be used multiple times including zero times e.g.[t/TAG]…can be used ast/friend,t/friend t/familyetc. -
Parameters can be in any order e.g. if the command specifies
n/NAME p/PHONE_NUMBER,p/PHONE_NUMBER n/NAMEis also acceptable.
5.1.1. Adding a person: add Since v1.0
|
Optional fields will be explained in greater detail in the next section. |
Adds a person to cherBook
Format: add n/NAME [p/(STUDENT_NUMBER)] pp/(PARENT_NUMBER) [e/EMAIL] [a/ADDRESS] f/FORMCLASS g/GRADES [c/POSTALCODE] [t/TAG]…
Shorthand: a n/NAME [p/(STUDENT_NUMBER)] pp/(PARENT_NUMBER) [e/EMAIL] [a/ADDRESS] f/FORMCLASS g/GRADES [c/POSTALCODE] [t/TAG]…
|
A person can have any number of tags (including 0) Adding of student or/and parent’s number must be preceded by the phone prefix p/.Tags added must be a single word. e.g. myName instead of my name. Remark cannot be add through the add command and has to be done though the remark command. |
Examples:
-
add n/John Doe pp/97979797 e/johnd@example.com a/John street, block 123, #01-01 f/12S11 g/123.0 c/203904 -
add n/Betsy Crowe t/friend e/betsycrowe@example.com a/Newgate Prison p/97272030 pp/97979797 f/B12 g/100.0 t/criminal -
a n/Jane Doe pp/97979791 e/janed@example.com a/Jane street, block 456, #01-01 f/6C g/98 -
a n/Lily Crowe t/friend e/lilycrowe@example.com a/Newgate Prison p/97272231 pp/97979997 f/12A2 g/66 t/criminal
Example:
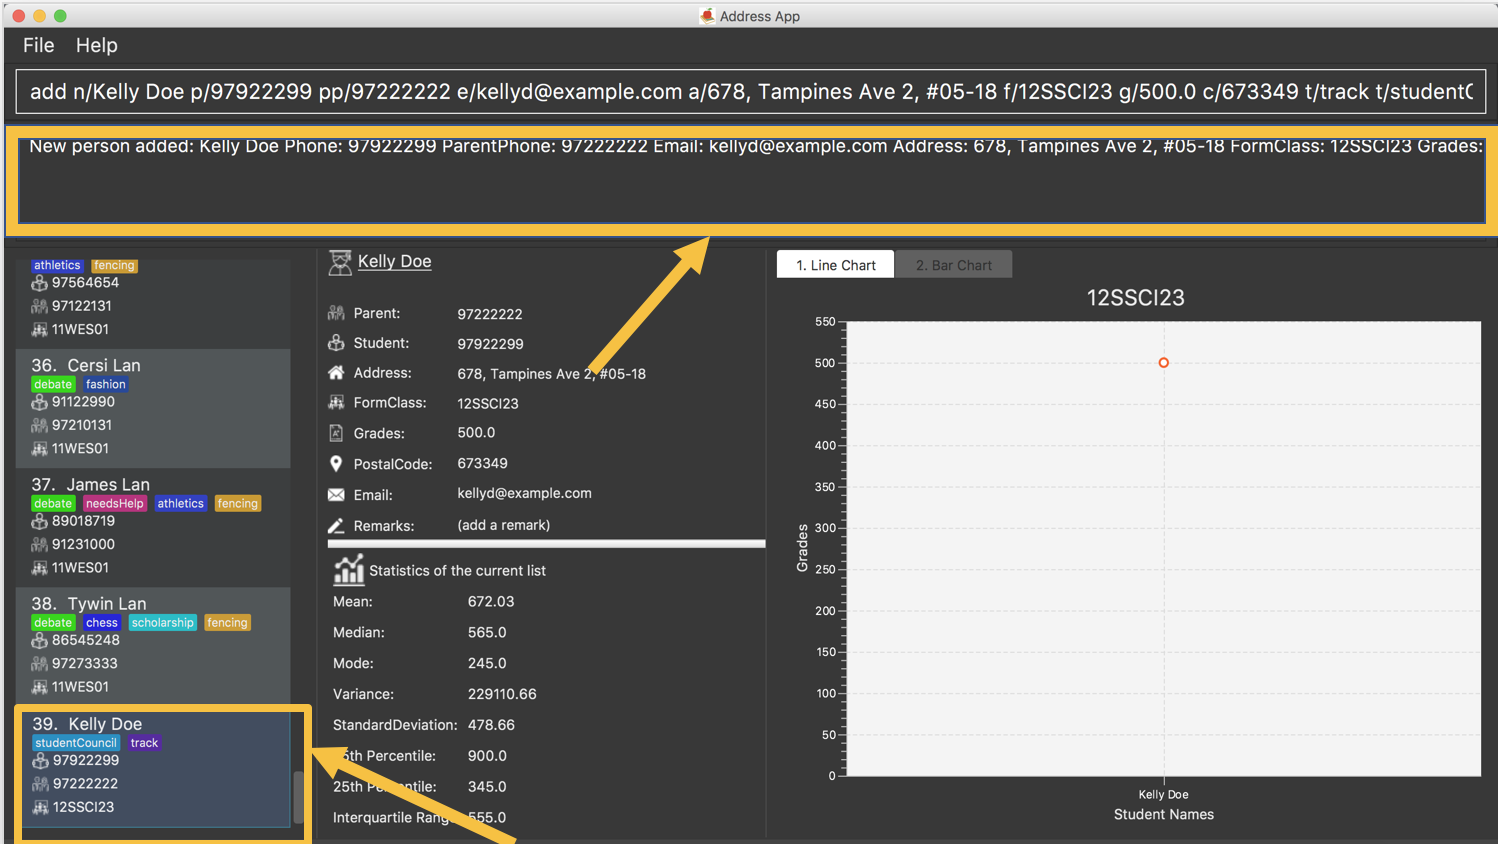
Figure 5.1.1.1 : How you can add contacts into your cherBook
Optional fields for adding a person Since v1.3
You can find a list of optional input fields for the add command in the table below.
|
When you do not enter any of the optional fields, a message will be generated to inform you that the particular field is not recorded. |
| Optional Field | Prefix | Example of user’s input in cherBook’s command box without the optional field |
|---|---|---|
Student Phone Number |
p/ |
add n/John pp/97272700 e/John@gmail.com a/Johnny street, block 321, #01-01 f/6C g/91 c/600321 t/Smart |
Address |
a/ |
add n/John p/97602611 pp/97272700 e/John@gmail.com f/6C g/91 c/600321 t/Smart |
Postal Code |
c/ |
add n/John p/97602611 pp/97272700 e/John@gmail.com a/Johnny street, block 321, #01-01 f/6C g/91 t/Smart |
e/ |
add n/John p/97602611 pp/97272700 a/Johnny street, block 321, #01-01 f/6C g/91 c/600321 t/Smart |
|
Tag |
t/ |
add n/John p/97602611 pp/97272700 e/John@gmail.com a/Johnny street, block 321, #01-01 f/6C g/91 c/600321 |
Example:
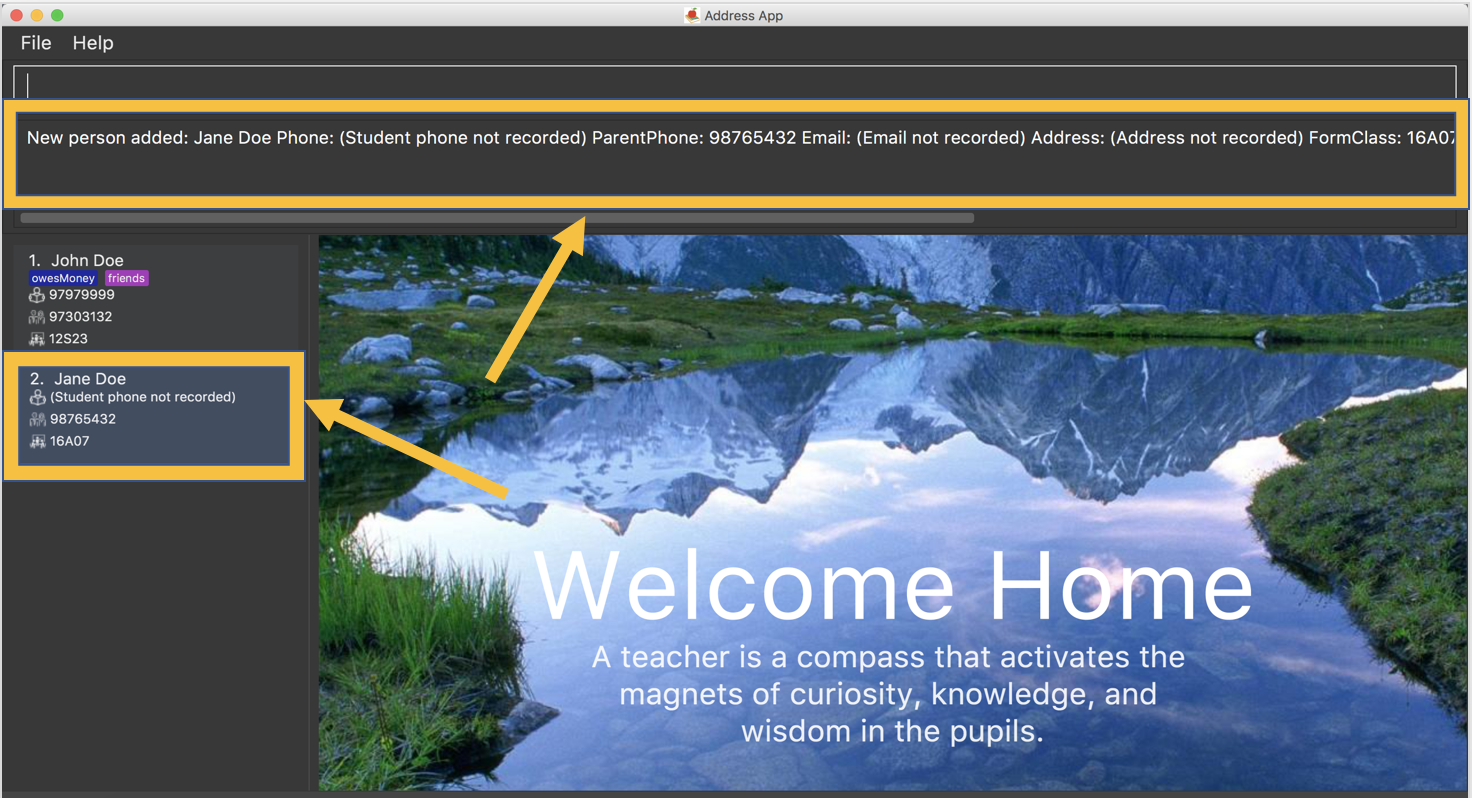
Figure 5.1.1.2 : Displays optional inputs for your contacts
5.1.2. Editing a person : edit Since v1.0
Edits an existing person in cherBook.
Format: edit INDEX [n/NAME] [p/(STUDENT_NUMBER)] [pp/(PARENT_NUMBER)] [e/EMAIL] [a/ADDRESS] [f/FORMCLASS] [g/GRADES] [c/POSTALCODE] [t/TAG]…
Shorthand: e INDEX [n/NAME] [p/(STUDENT_NUMBER)] [pp/(PARENT_NUMBER)] [e/EMAIL] [a/ADDRESS] [f/FORMCLASS] [g/GRADES] [c/POSTALCODE] [t/TAG]…
| Tags edited must be a single word. e.g. myName instead of my name. Remark cannot be edited and have to be done through the remark command. |
Examples:
-
edit 1 pp/91234567 e/johndoe@example.com c/309428
Edits the parent phone number, email address and postal code of the 1st person to be91234567,johndoe@example.comand309428respectively. -
edit 2 n/Betsy Crower t/
Edits the name of the 2nd person to beBetsy Crowerand clears all existing tags. -
e 1 p/91234567 pp/91242271 e/johndoe@example.com
Edits the student and parent phone number, and email address of the 1st person to be91234567,91242271andjohndoe@example.comrespectively. -
e 2 n/Betsy Crower t/
Edits the name of the 2nd person to beBetsy Crowerand clears all existing tags.
Example:
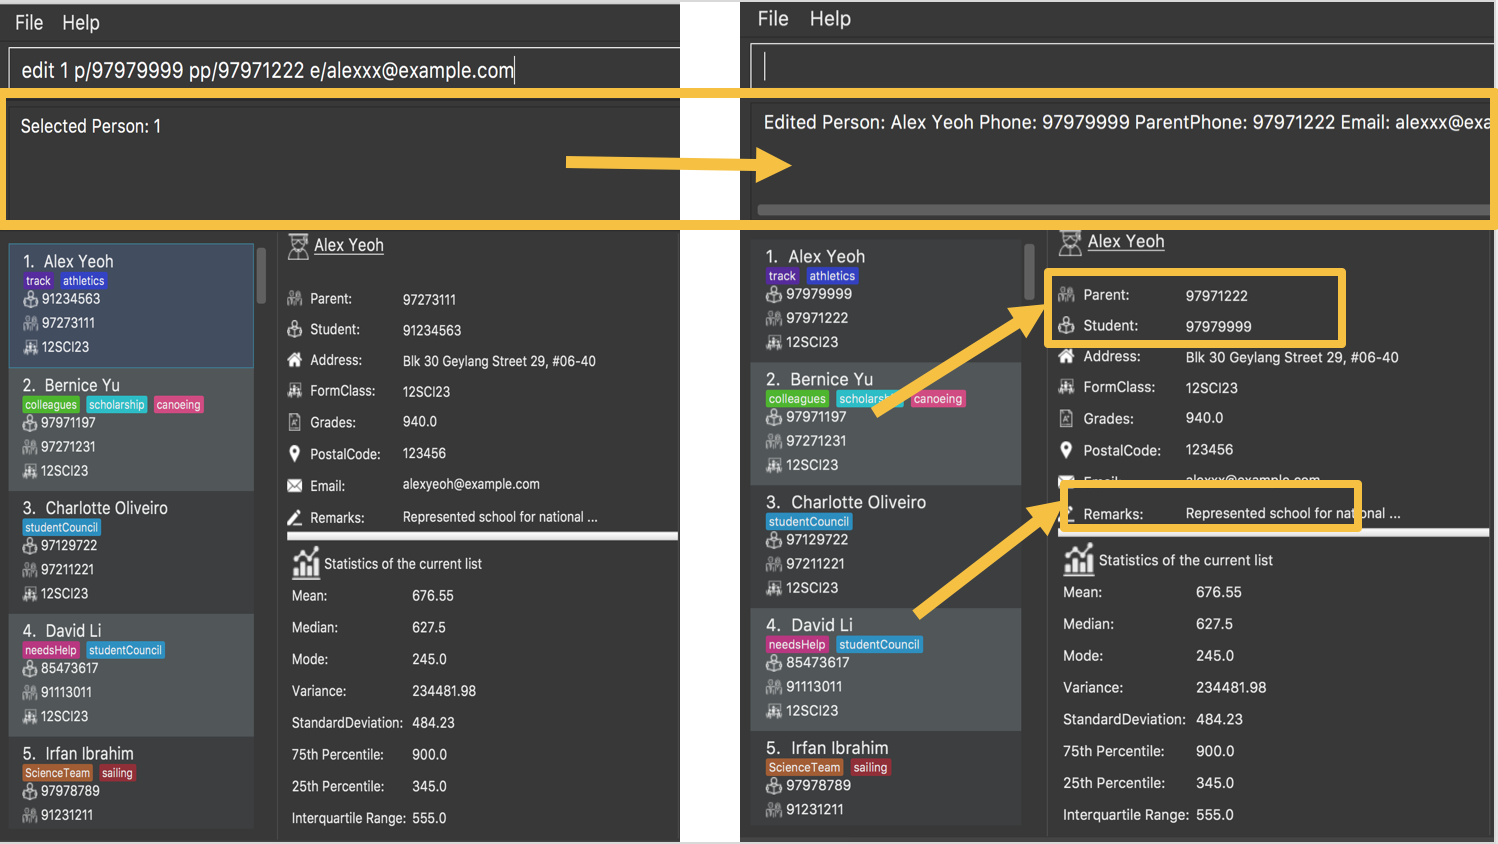
Figure 5.1.2.1 : Edits a contact in your cherBook
5.1.3. Deleting a person : delete Since v1.0
Removes an existing person from cherBook.
Format: delete INDEX
Shorthand: d INDEX
Examples:
-
list
delete 2
Deletes the 2nd person in cherBook. -
find Betsy
delete 1
Deletes the 1st person in the results of thefindcommand. -
list(listcommand)
d 3(delete 3command)
Deletes the 3rd person in cherBook.
Example:
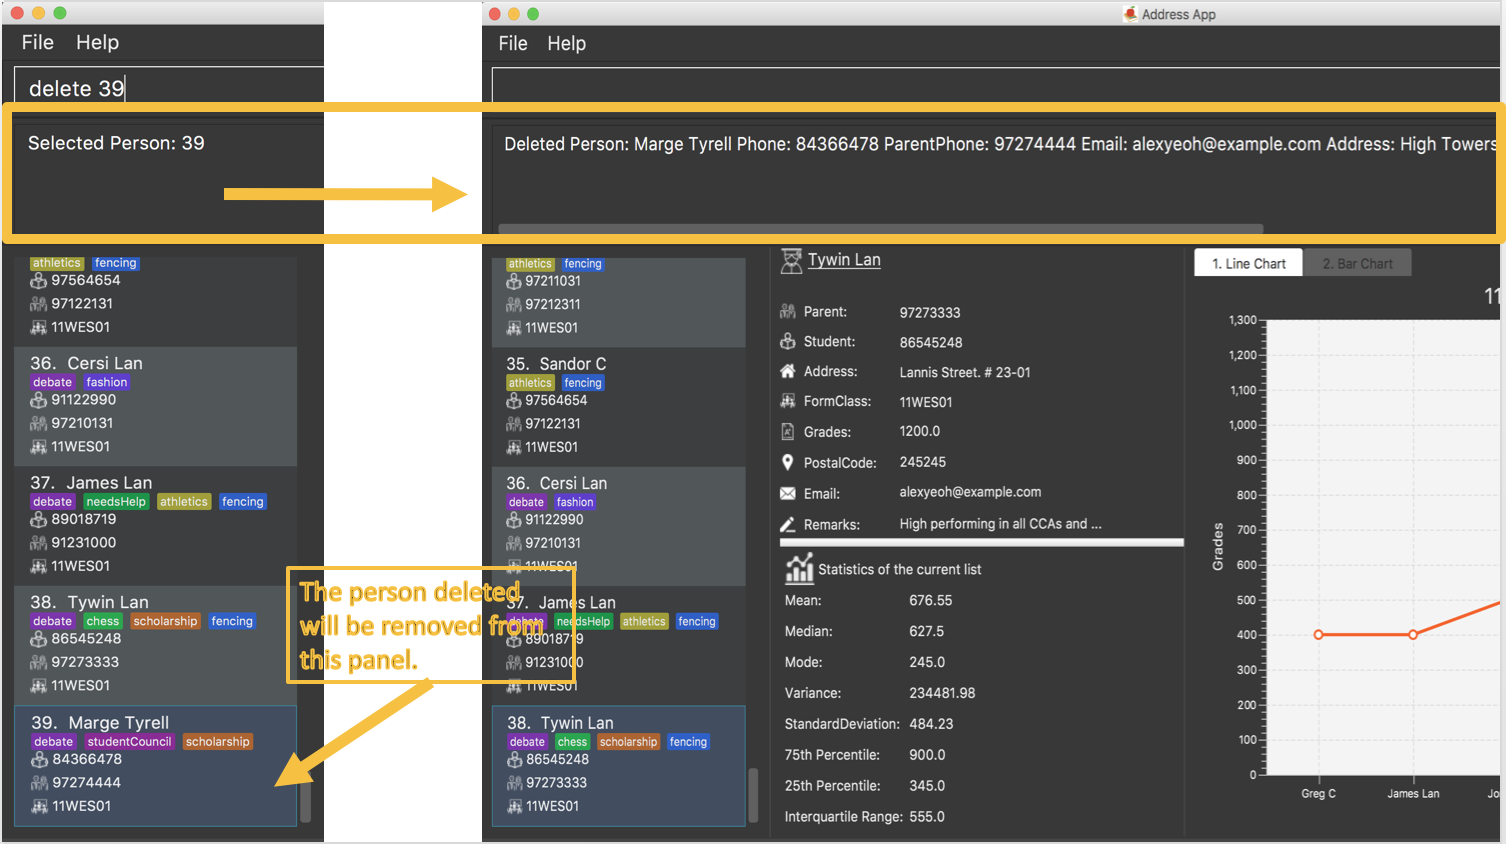
Figure 5.1.3.1 : Deletes the contact in your cherBook with the specified index
5.1.4. Overwrites a remark to a person : remark Since v1.2
Overwrites a remark from the specified person in cherBook
Format: remark Index [rm/REMARK]
Shorthand: rm Index [rm/REMARK]
|
Addition of remarks on a person already with remarks will be overwritten. Person with no remarks will display (add a new remark).Can only be changed through the use of the remark command.
|
Examples:
-
list
remark 2 rm/This is a remark
Overwrites the 1st person remark. -
find betsy
remark 1 rm/Betsy is a female
Overwrites the 1st person in the results offindcommand. -
list
remark 2 rm/
Overwritesremarkfrom the 2nd person in the address book and displays it as(add a new remark).
Example:
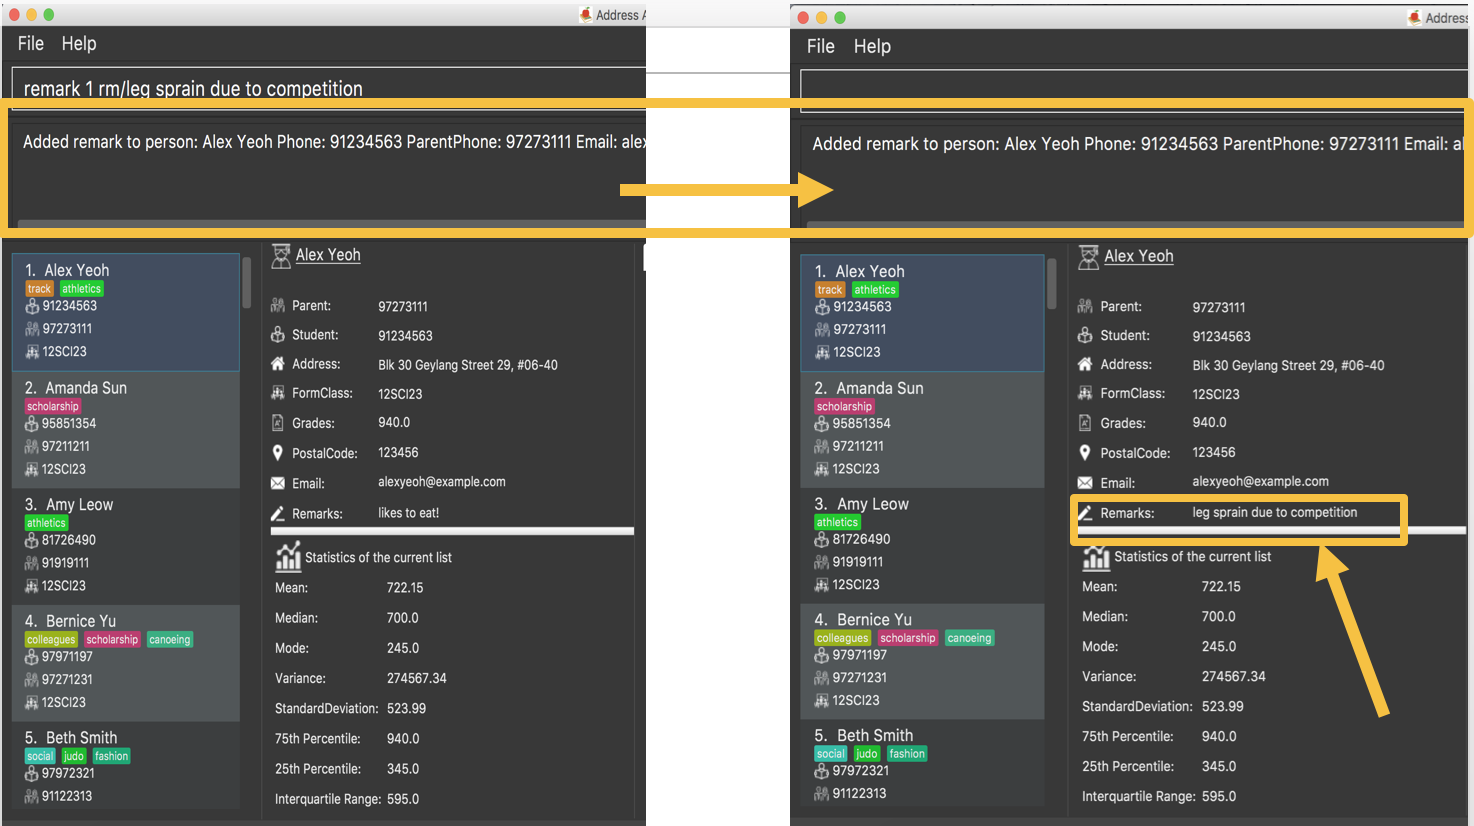
Figure 5.1.4.1 : Add a remark to your contacts in cherBook
5.1.5. Selecting a person : select Since v1.0
Selects an existing person in cherBook.
Format: select INDEX
Shorthand: s INDEX
Examples:
-
list
select 2
Selects the 2nd person in cherBook. -
find Betsy
select 1
Selects the 1st person in the results of thefindcommand. -
l(listcommand)
s 3(select 3command)
Selects the 3rd person in cherBook.
Example:
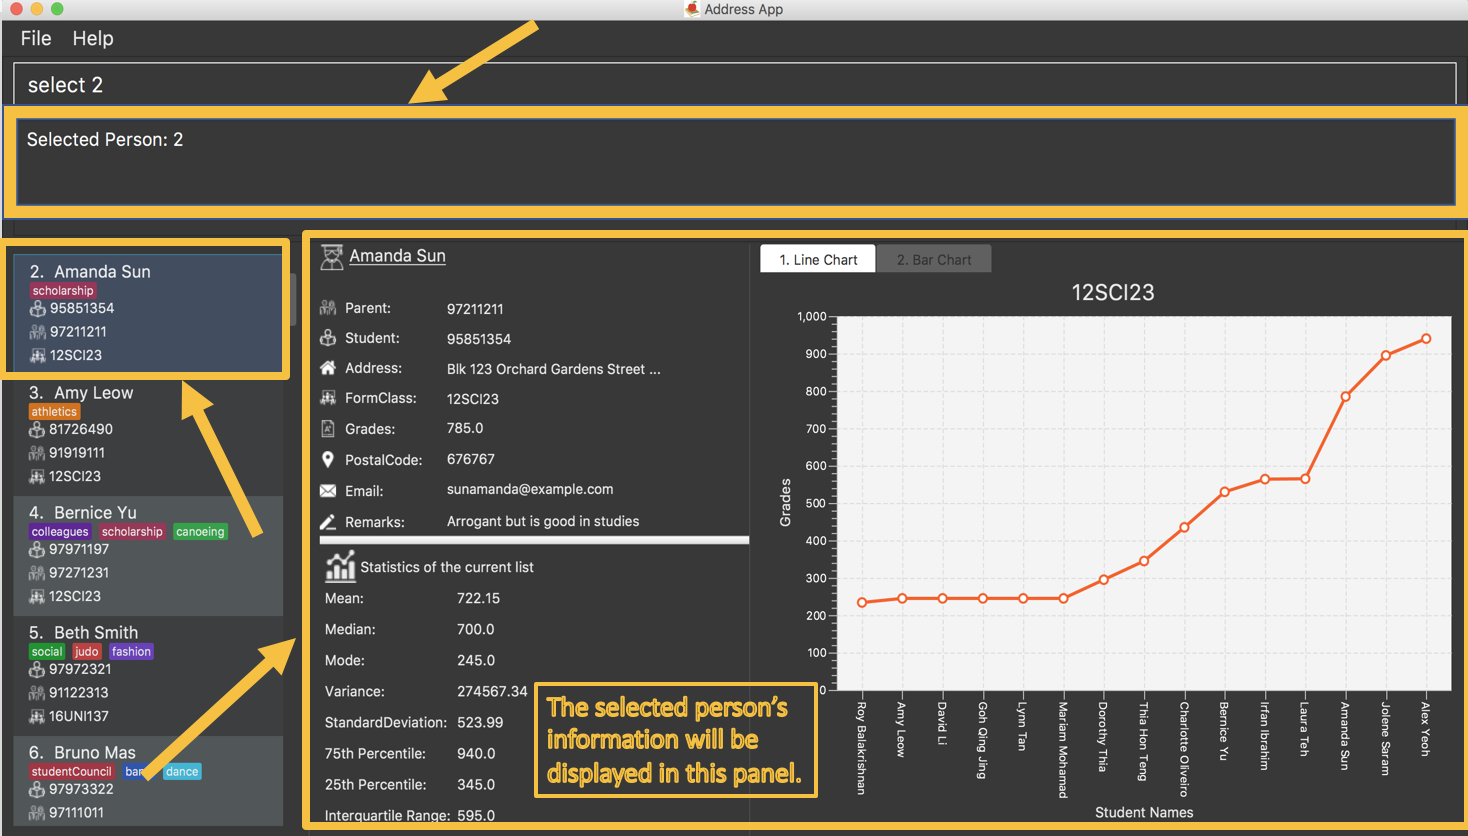
Figure 5.1.5.1 : Selects the contact in your cherBook with the specified index
5.1.6. Locating persons by name: find Since v1.0
Finds persons whose names contain any of the given keywords.
Format: find KEYWORD [MORE_KEYWORDS]
Shorthand: f KEYWORD [MORE_KEYWORDS]
Examples:
-
find John
ReturnsjohnandJohn Doe -
find Betsy Tim John
Returns any person having namesBetsy,Tim, orJohn -
f John
ReturnsjohnandJohn Doe -
f Betsy Tim John
Returns any person having namesBetsy,Tim, orJohn
Example:
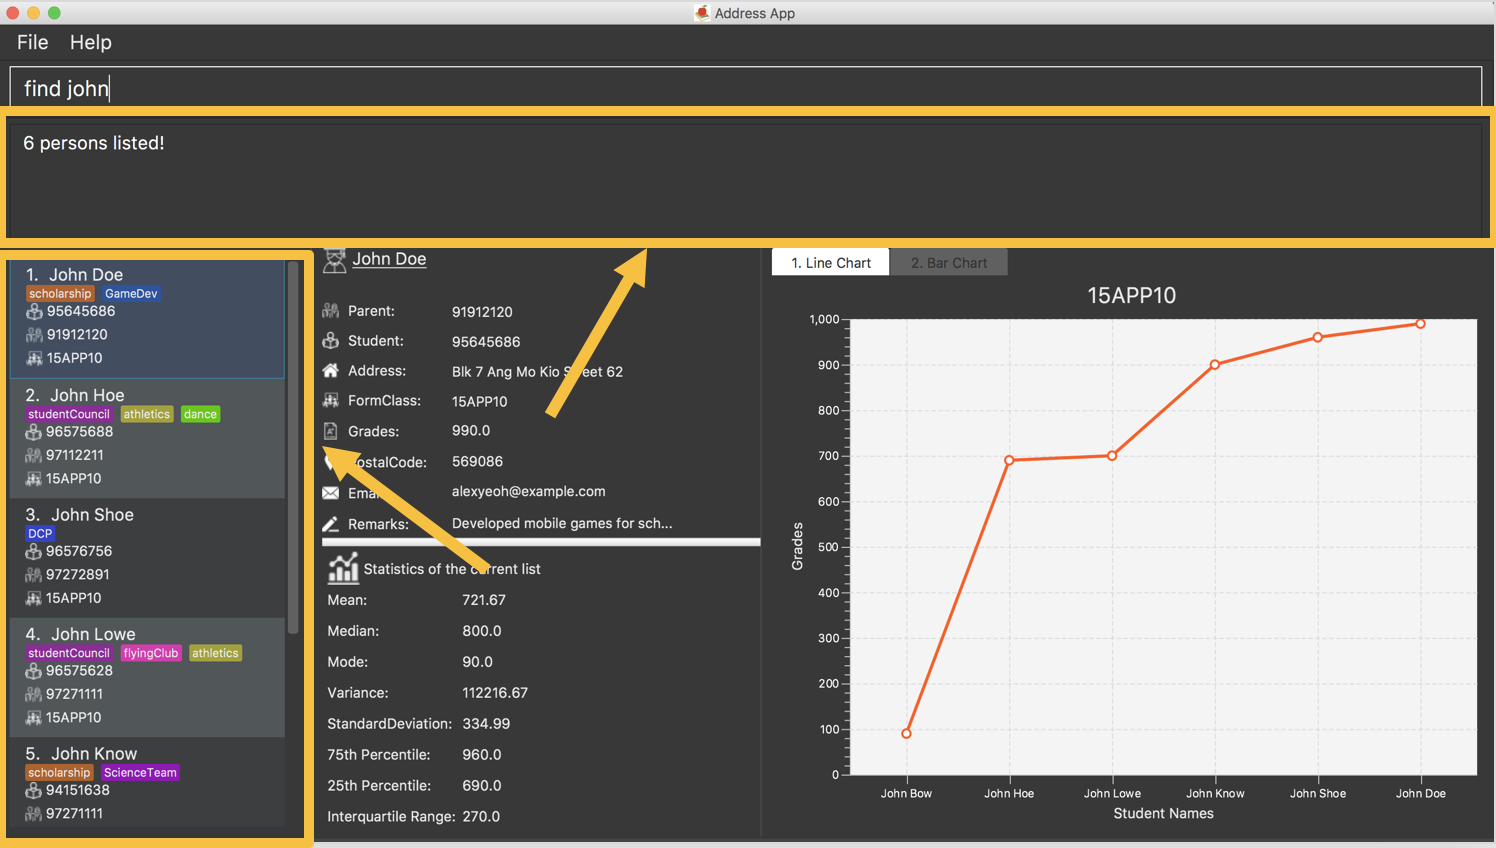
Figure 5.1.6.1 : Finds and displays all contacts in your cherBook with the specified keyword
5.1.7. Locating persons by tags: findtags Since v1.1
Finds persons whose tags contain all of the given keywords.
Format: findtags KEYWORD [MORE_KEYWORDS]
Shorthand: ft KEYWORD [MORE_KEYWORDS]
| Only one tag can be searched at any one time. |
Examples:
-
findtags friends
Returns any person having the tagfriends -
findtags friends owesMoney
Returns any person having bothfriendsandowesMoneytags -
ft John
Returns any person having the tagfriends -
ft Betsy Tim John
Returns any person having bothfriendsandowesMoneytags
Example:
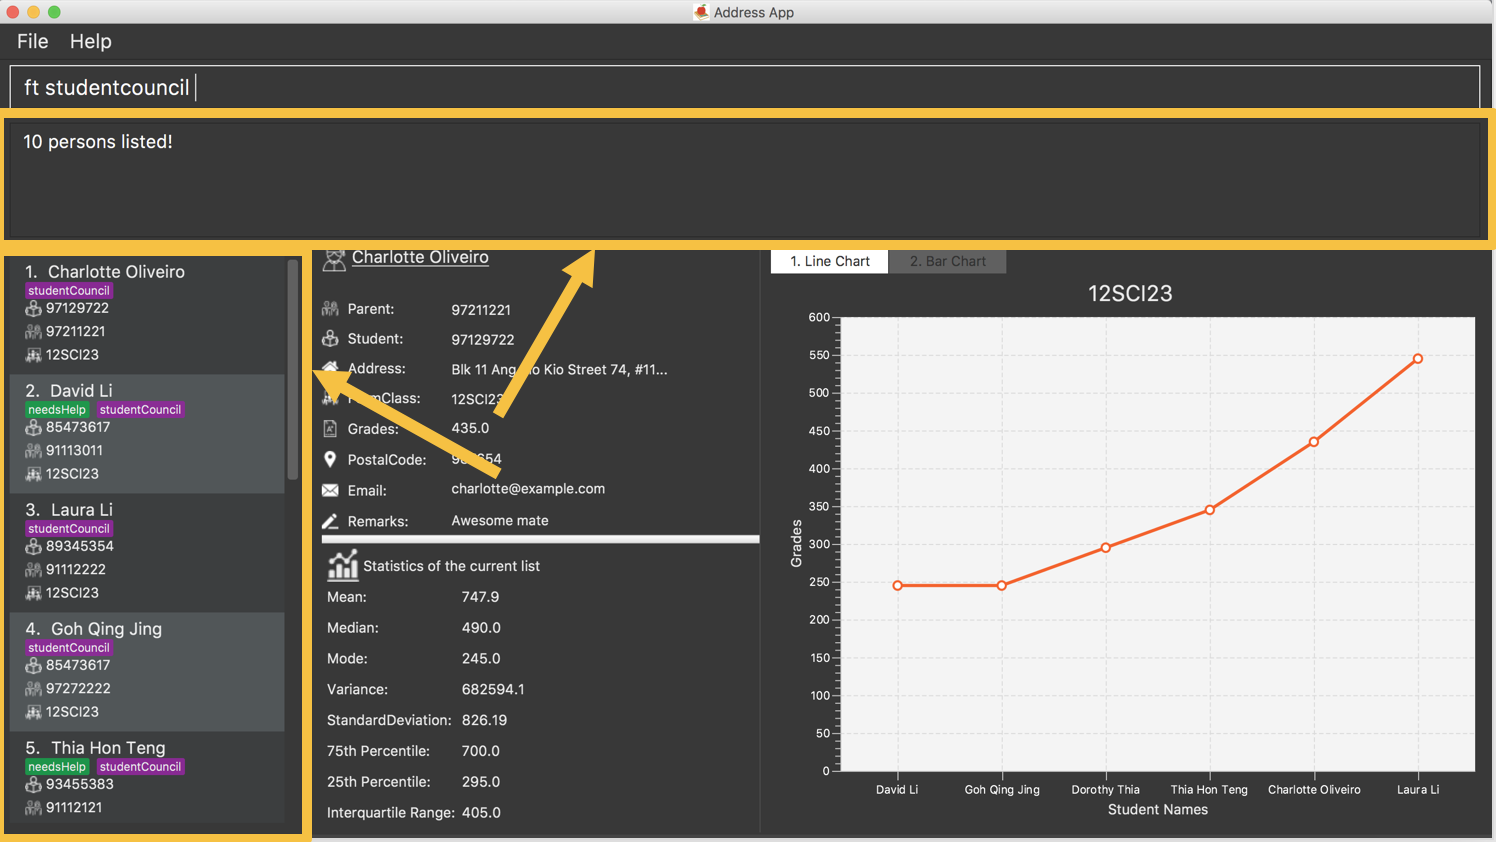
Figure 5.1.7.1 : Find contacts on your cherBook with the specified tags
5.1.8. Listing all persons : list Since v1.0
Shows you a list of all persons in cherBook.
Format: list
Shorthand: l
Example:
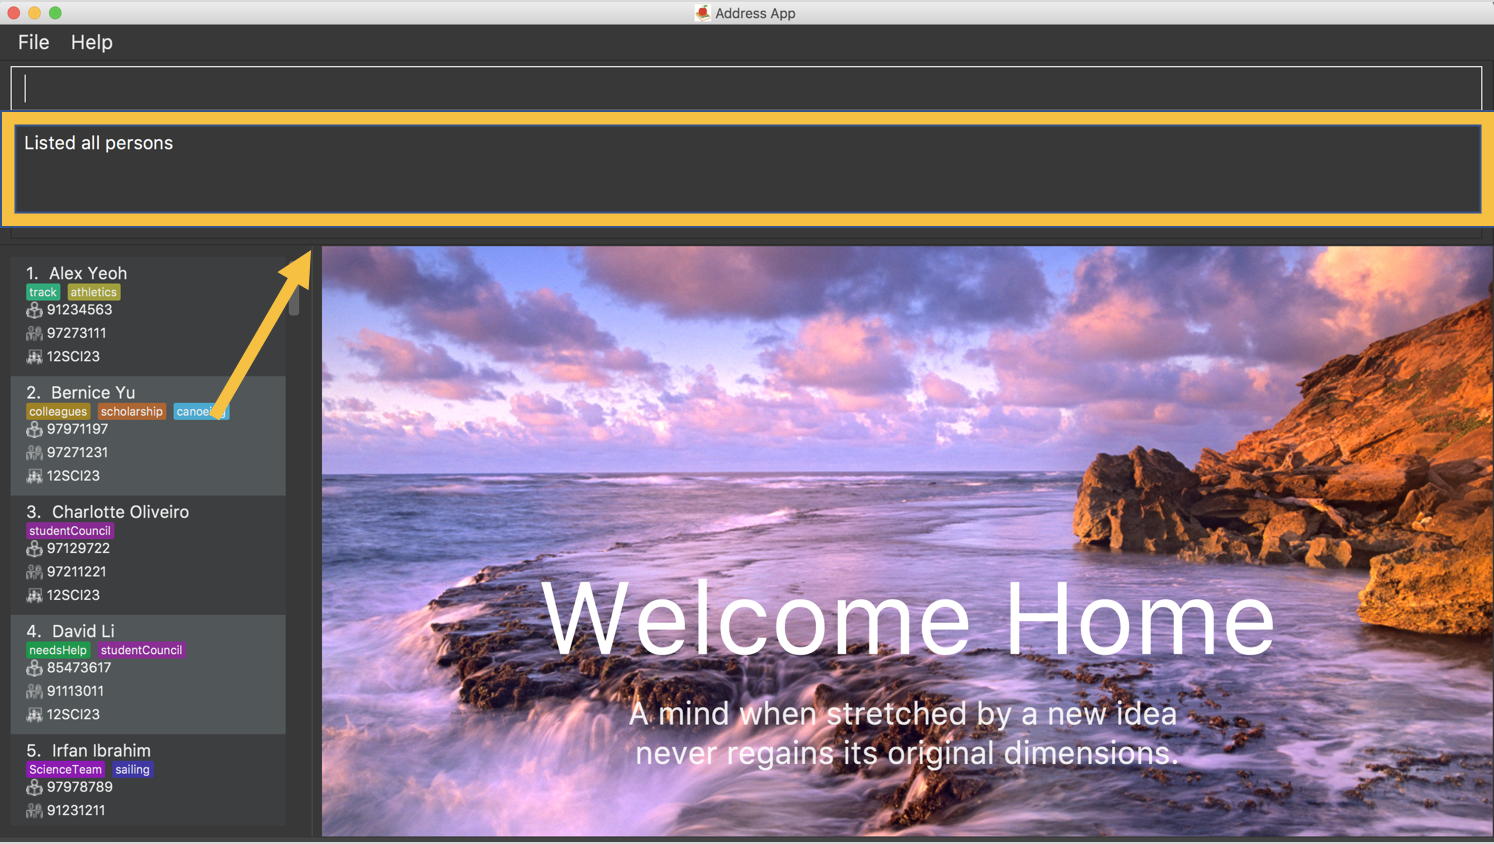
Figure 5.1.8.1 : Lists all contacts in your cherBook
5.1.9. Sorting all persons : sort Since v1.2
Helps you sort all persons in cherBook.
Shows you a list of all persons in cherBook with their names sorted in alphabetical order.
If you want your list to be sorted at all times, you can use this sort command after adding contacts into cherBook,
After that, your contact list would always be sorted when you perform other commands on cherBook.
Format: sort
Shorthand: st
Examples:
-
list
sort
Sorts the list in alphabetical order. -
find Betsy
st
Sorts the list in alphabetical order.
Example:
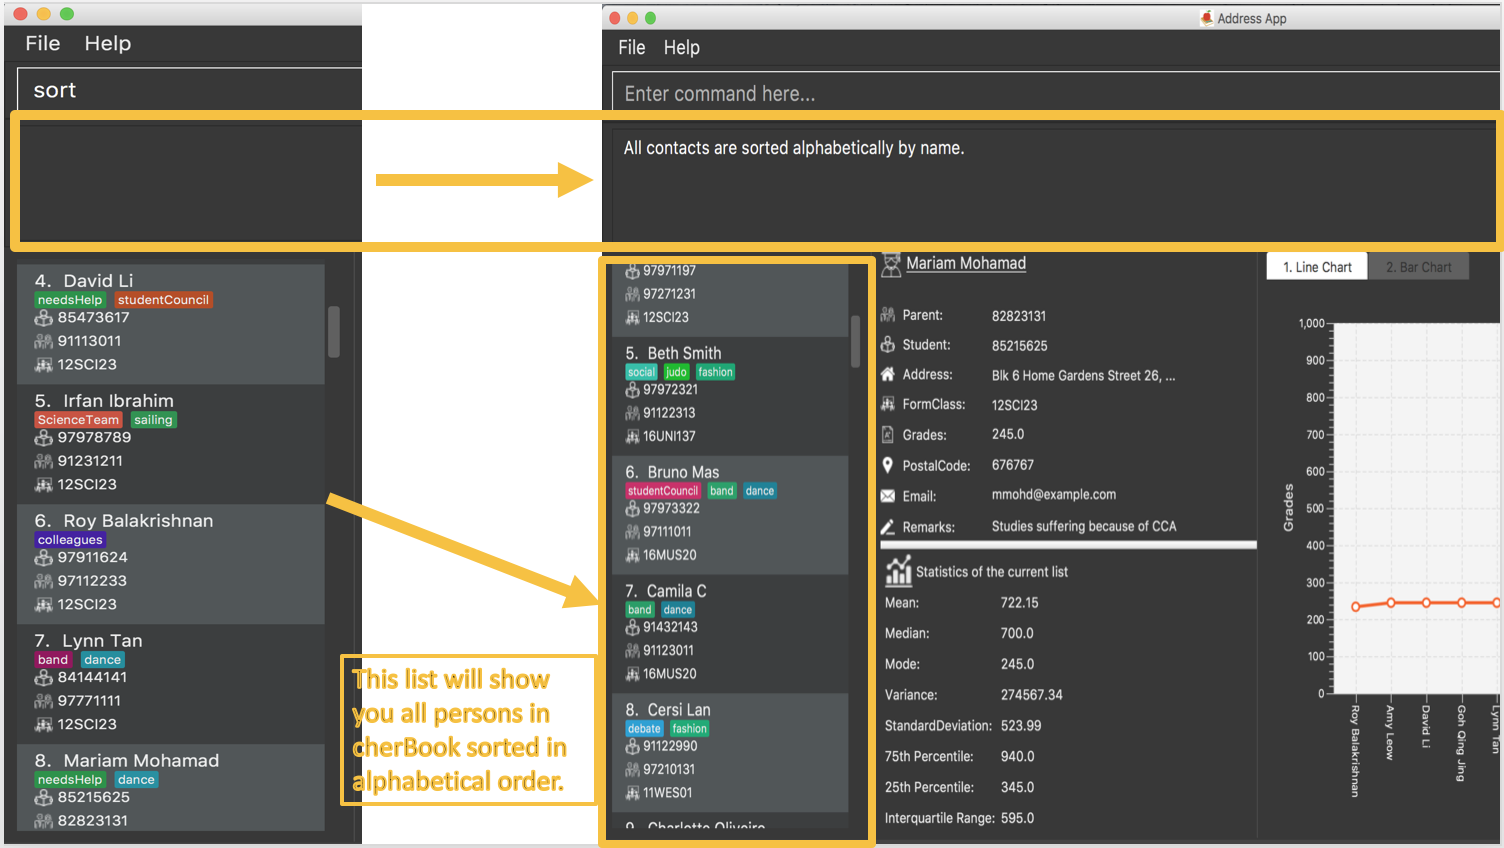
Figure 5.1.9.1 : Sorts and displays all your contacts in cherBook
5.1.10. Clearing all entries : clear Since v1.0
Clears all student and schedule entries from cherBook.
Format: clear
5.2. Schedule Management Features
5.2.1. Adding a schedule : schedule Since v1.4
Schedules the person identified by the index number used in the last person listing.
Format: addschedule INDEX s/[DATE]
Shorthand: addsch INDEX s/[DATE]
Examples:
-
list
addschedule 2 s/tomorrow 7pm
Schedules the 2nd person in cherBook for tomorrow at 7pm and adds the schedule to the schedule list. -
find Betsy
addsch 1 s/25 december 2017 3pm
Schedules the 1st person in cherBook on 25 December at 3pm and adds the schedule to the schedule list in the results of thefindcommand.
Example:
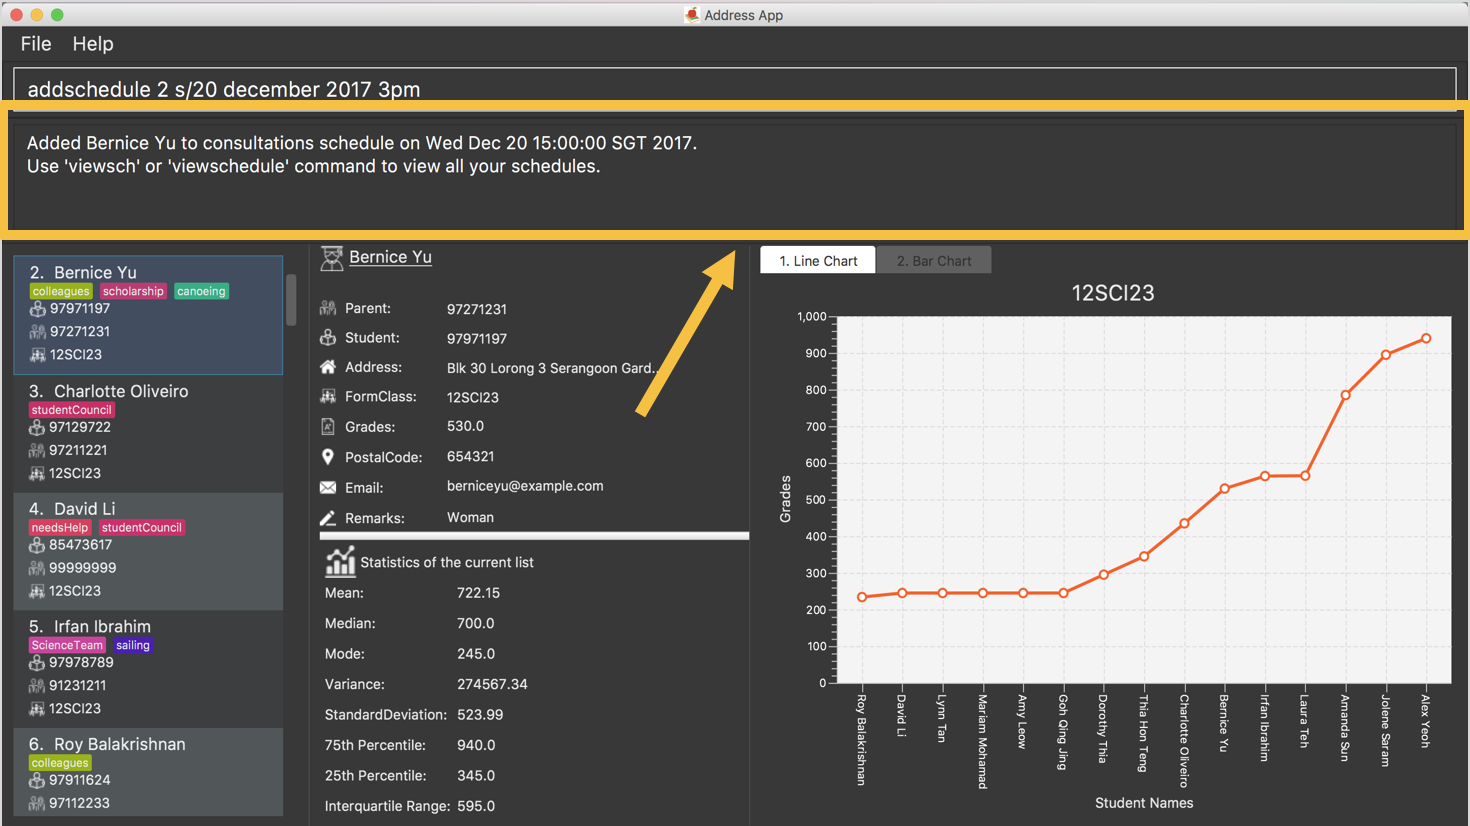
Figure 5.2.1.1 : Adds a schedule to your cherBook
5.2.2. Viewing my schedule : viewschedule Since v1.5
View your full schedule list in cherBook.
Format: viewschedules
Shorthand: viewsch
Examples:
-
list
viewschedules
Displays all your schedules in the command box. -
find Betsy
viewsch
Displays all your schedules in the command box.
Example:
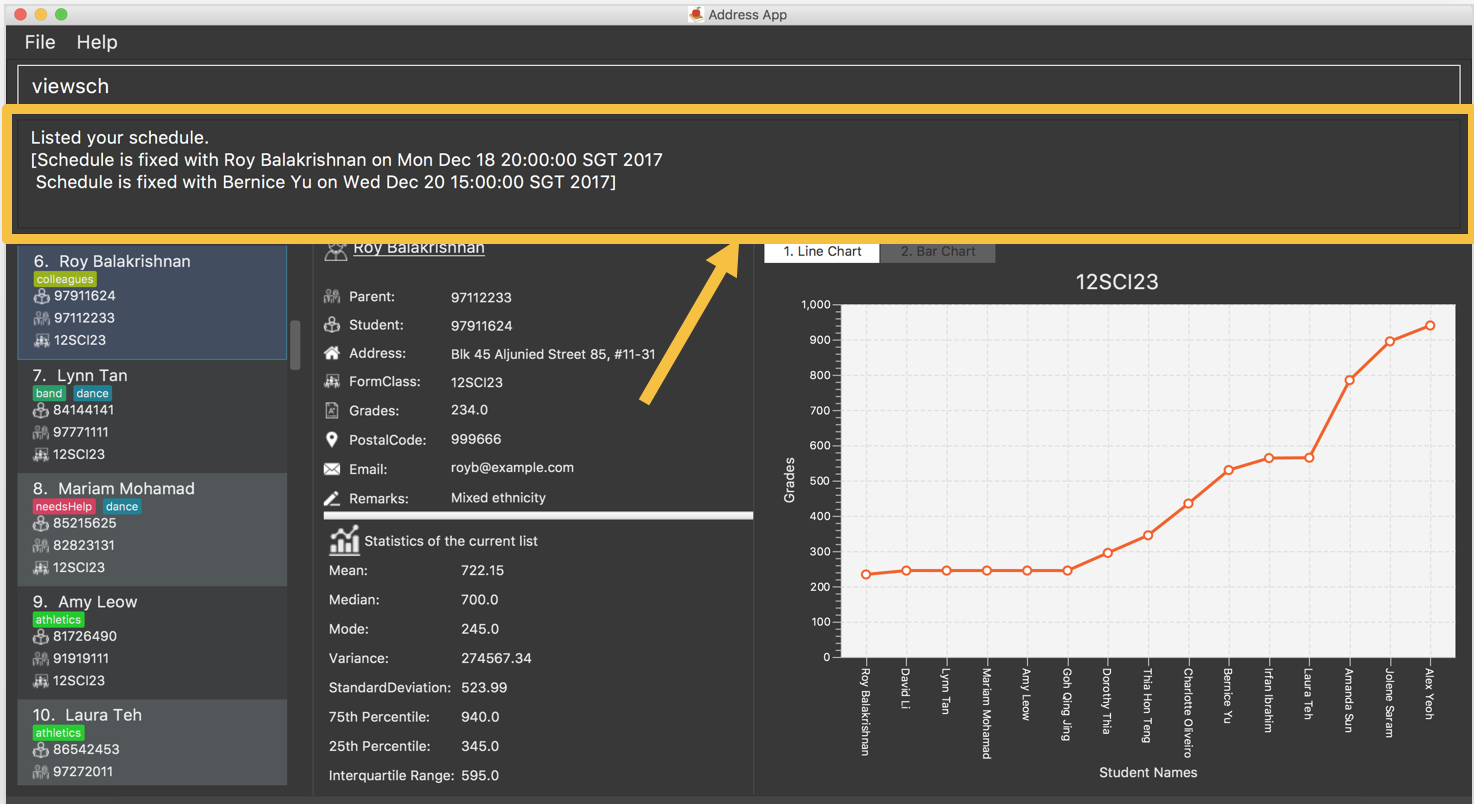
Figure 5.2.2.1 : View all your schedules in cherBook as shown in the box
5.2.3. Deleting a schedule : deleteschedule Since v1.5
Deletes the specified schedule from cherBook.
Format: deleteschedule INDEX
Shorthand: deletesch INDEX
Examples:
-
viewschedule
deleteschedule 2
Deletes the 2nd schedule in the results of theviewschedulecommand which returns a list of schedules. -
viewsch
deletesch 1
Deletes the 1st schedule in the results of theviewschcommand which returns a list of schedules.
Example:

Figure 5.2.3.1 : Deletes the schedule in your cherBook with the specified index
5.3. User Interface Features
5.3.1. Home Panel Since v1.5
cherBook has a start up Home panel which displays a picture to help you unwind even just a tiny bit.
It also displays random inspirational quotes to help you make yourself feel better.
What is better then starting off a day right feeling good.
These quotes changes every time the home page displayed through either calling then home command or starting the application.
Switching to home screen: home Since v1.5
Switch all panels on the right to the home page.
The quotes on the home page is generated on random for you.
Using the select command toggles the panel to Student Details Panel, Statistics Panel and Graph Panel.
Format: home
To select your contacts on this page, use the select command. This is to ensure that people who access your cherBook are unable to view the information of your contacts easily.Do Not click on contacts while home page is being displayed! Use select command first and only when the panels do toggle are you able to click on the Students Panel.
|
Examples:

Figure 5.3.1.1 : Returns to the home page of cherBook
5.3.2. Student Details Panel Since v1.3
cherBook uses the Student Details Panel to display details belonging to the currently selected student.
The details changes automatically where there is a change to the list of students in the Students Panel.
You can use these details to pick out relevant information you need from your student.
5.3.3. Statistics Panel Since v1.4
cherBook uses the Statistics Panel to display the relevant statistics for the current list of students in the Students Panel.
The statistics changes automatically when there is a change to the list of students in the Students Panel.
E.g. When you enter the command findtags studentCouncil, the Students Panel will only show students with the studentcouncil tag and Statistics Panel will then show statistics for students with the studentcouncil tag.
You can use these statistics to pick out trends in your student’s grades and also monitor how well they are coping with their studies.
5.3.4. Graph Panel Since v1.3
cherBook uses a GraphPanel to plot the grades of all classmates of the selected student on a graph.
The graphs are automatically sorted from the lowest grade to the highest.
There are two tabs for you to choose from, line or bar and can be switch by using the tab command.
The details changes when another student from a different class is selected.
You can use these graph to better understand the trends of grades in a glance to easily see who are the weaker or stronger students.
Switching between graphs: tab Since v1.5
Switches between the line and bar chart in the GraphPanel.
Format: tab TABNUMBER
|
Valid numbers are determined by number of tabs available. In this case, only 1 and 2 are valid, which displays line or bar respectively. Typing the same index on the selected graph would just do nothing. |
Example:
-
tab 2
Remains at tab 2 if tab 2 is selected else switches to tab 2.
Examples:
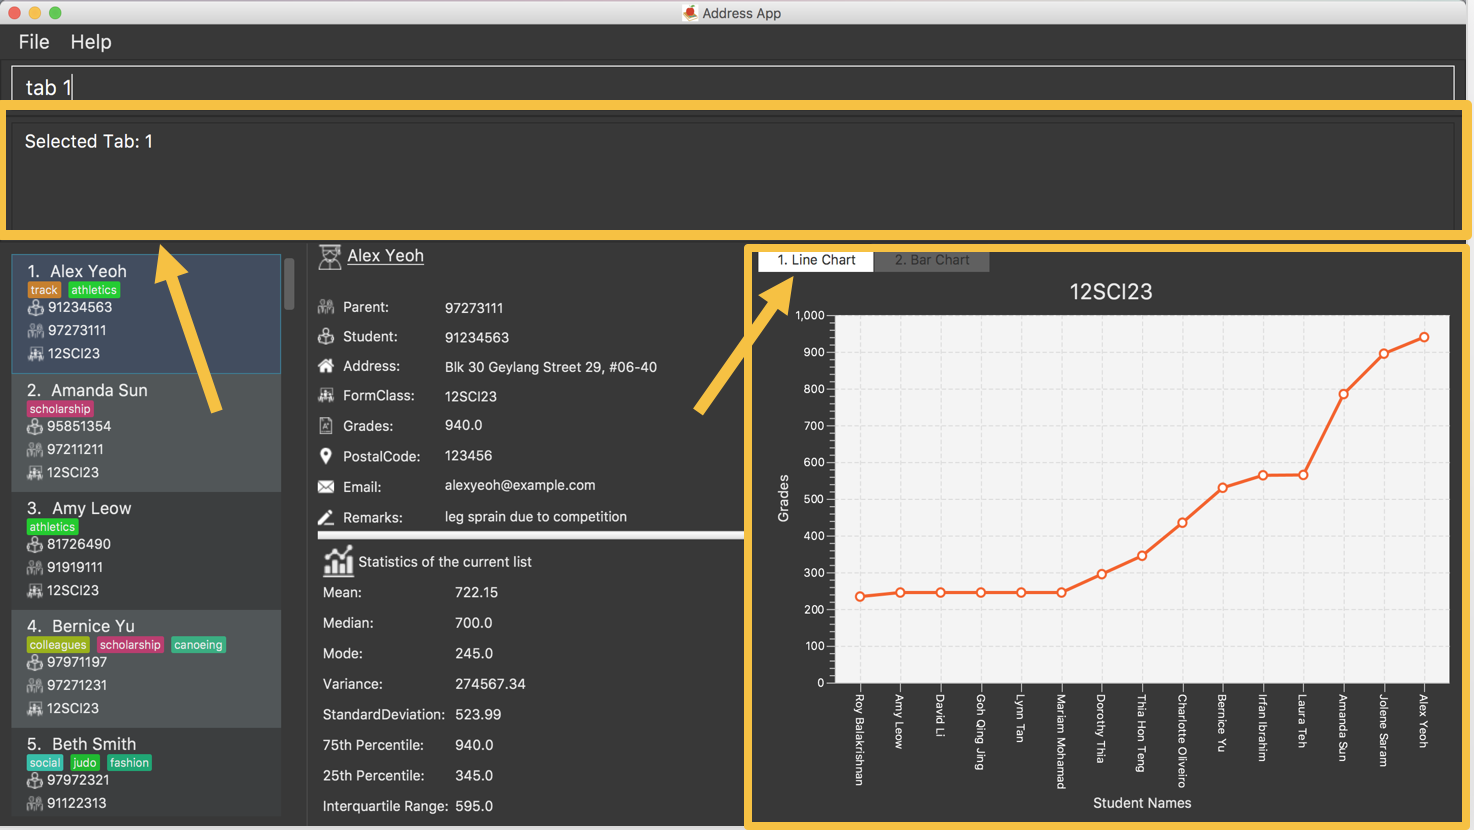
Figure 5.3.4.1 : Displays the graph in your cherBook with the first tab index
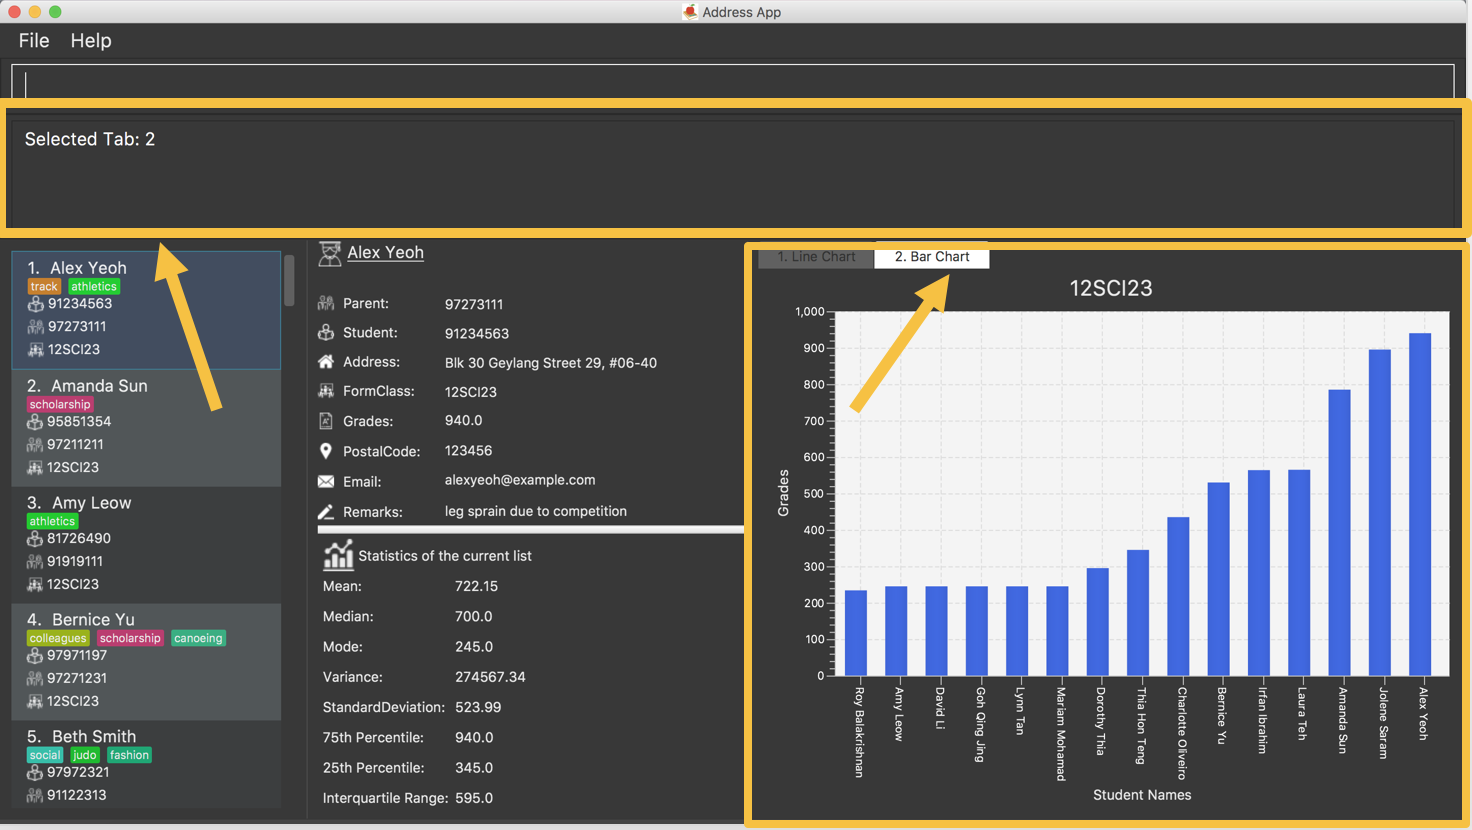
Figure 5.3.4.2 : Displays the graph in your cherBook with the second tab index
5.3.5. Randomised Unique Tag Colors: Since v1.4
For your convenience, all assignment of colors will be automated by cherBook for you.
Whenever you access the cherBook, a new range of random colors will be assigned to the background of the tags.
Modifications were made to the range of possible colors. It is to ensure that the background color’s saturation and lumination is at an optimal level
to match with the white font of the tag description. Thus, allowing you to be able to see the tag description clearly as seen in the following picture.
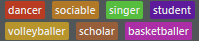
Figure 5.3.5.1 : Example of color tags
5.4. General Features
5.4.1. Viewing help : help Since v1.0
View cherBook’s User Guide in the help window.
Format: help
Example:
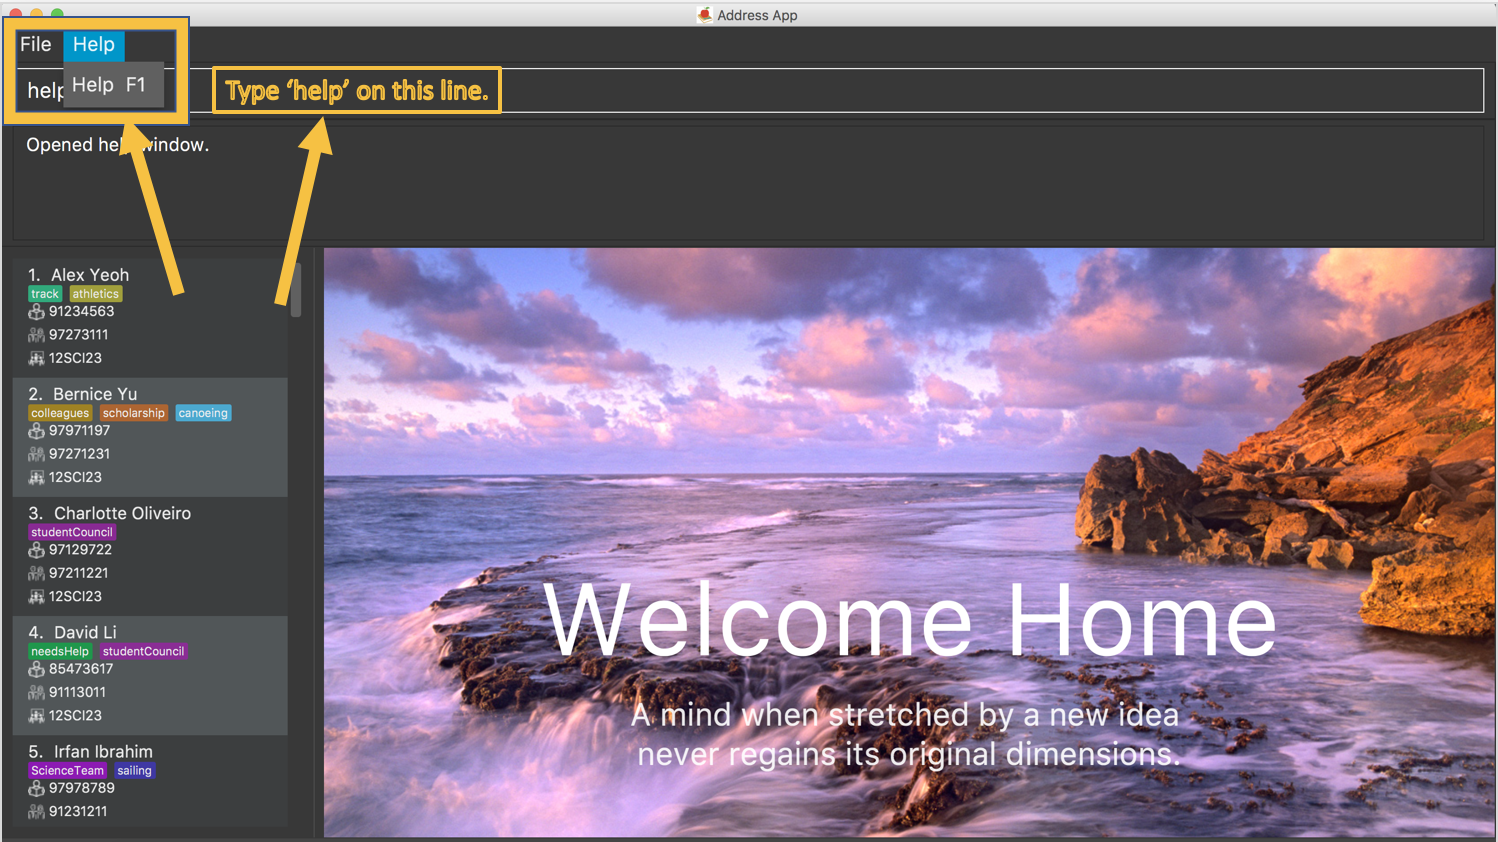
Figure 5.4.1.1 : The two ways you can use 'help' in cherBook
5.4.2. Listing entered commands : history Since v1.0
Lists all the commands that you have entered in reverse chronological order.
Format: history
Shorthand: h
|
Pressing the ↑ and ↓ arrows will display the previous and next input respectively in the command box. |
Example:
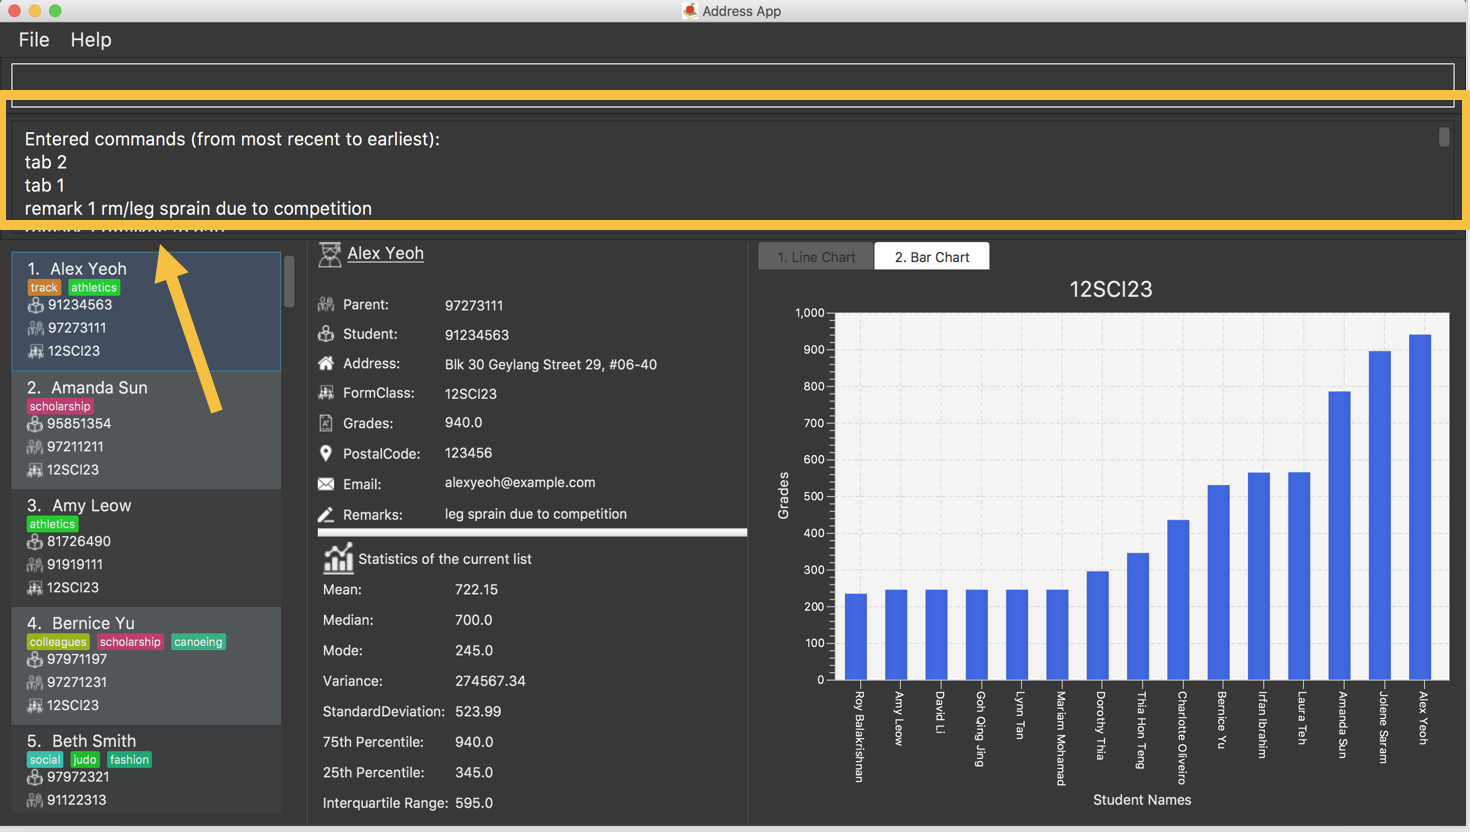
Figure 5.4.2.1 : Displays a list of all your previous actions on cherBook
5.4.3. Undoing previous command : undo Since v1.0
Restores cherBook to the state before the previous undoable command was executed.
Format: undo
Shorthand: u
|
Undoable commands: those commands that modify cherBook’s content ( |
Examples:
-
delete 1
list
undo(reverses thedelete 1command) -
select 1
list
undo
Theundocommand fails as there are no undoable commands executed previously. -
delete 1
clear
undo(reverses theclearcommand)
undo(reverses thedelete 1command) -
d 1(delete 1command)
l(listcomand)
u(undocommand reverses thedelete 1command)
Example:

Figure 5.4.3.1 : Undo your previous action on cherBook
5.4.4. Redoing the previously undone command : redo Since v1.0
Reverses the most recent undo command.
Format: redo
Shorthand: r
Examples:
-
delete 1
undo(reverses thedelete 1command)
redo(reapplies thedelete 1command) -
delete 1
redo
Theredocommand fails as there are noundocommands executed previously. -
delete 1
clear
undo(reverses theclearcommand)
undo(reverses thedelete 1command)
redo(reapplies thedelete 1command)
redo(reapplies theclearcommand) -
d 1(delete 1command)
u(undocommand reverses thedelete 1command)
r(reapplies thedelete 1command)
Example:
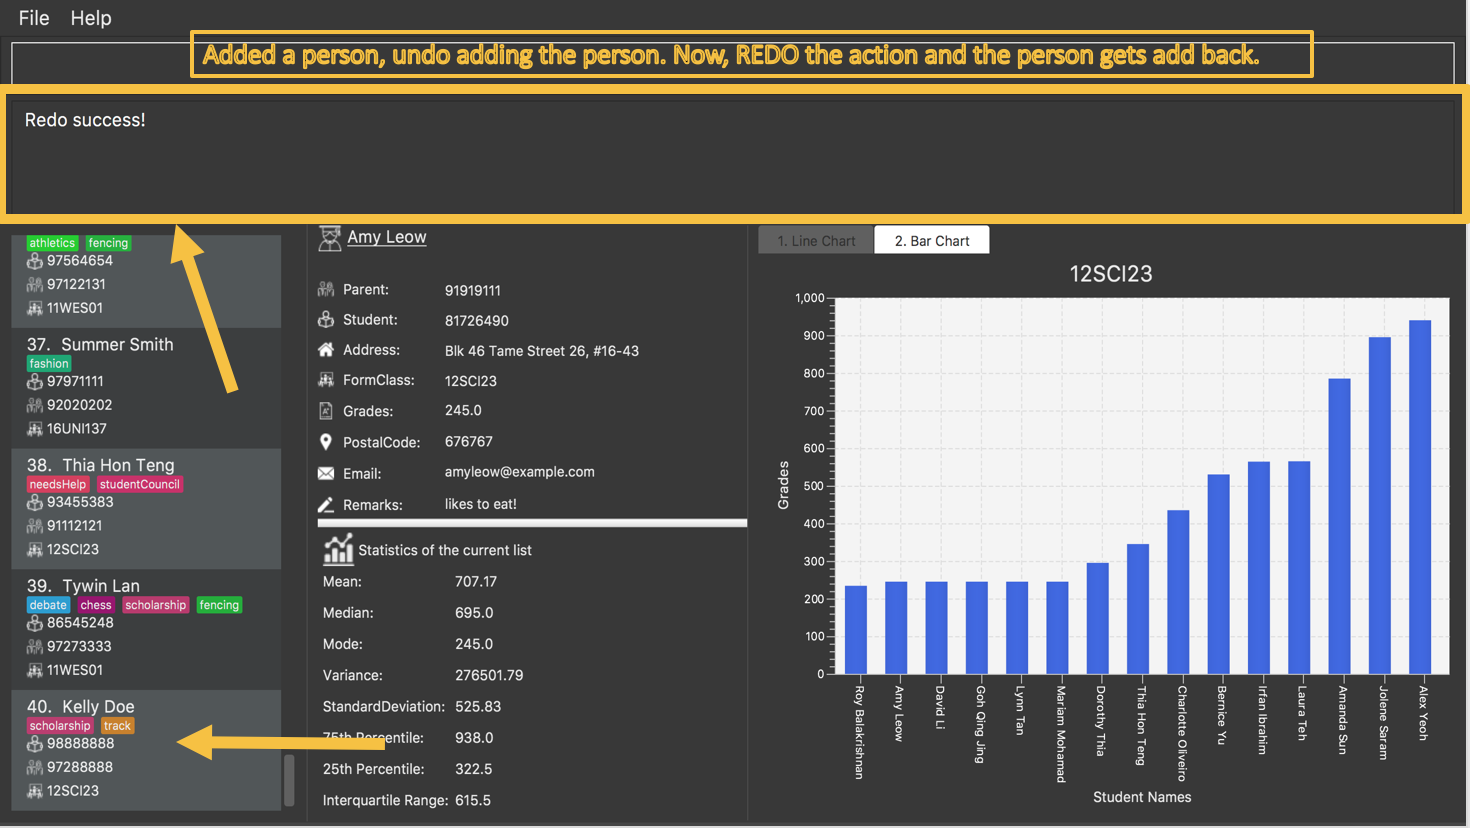
Figure 5.4.4.1 : Redo your previous action on cherBook
5.4.5. Exiting the program : exit Since v1.0
Exits the program.
Format: exit
Example:
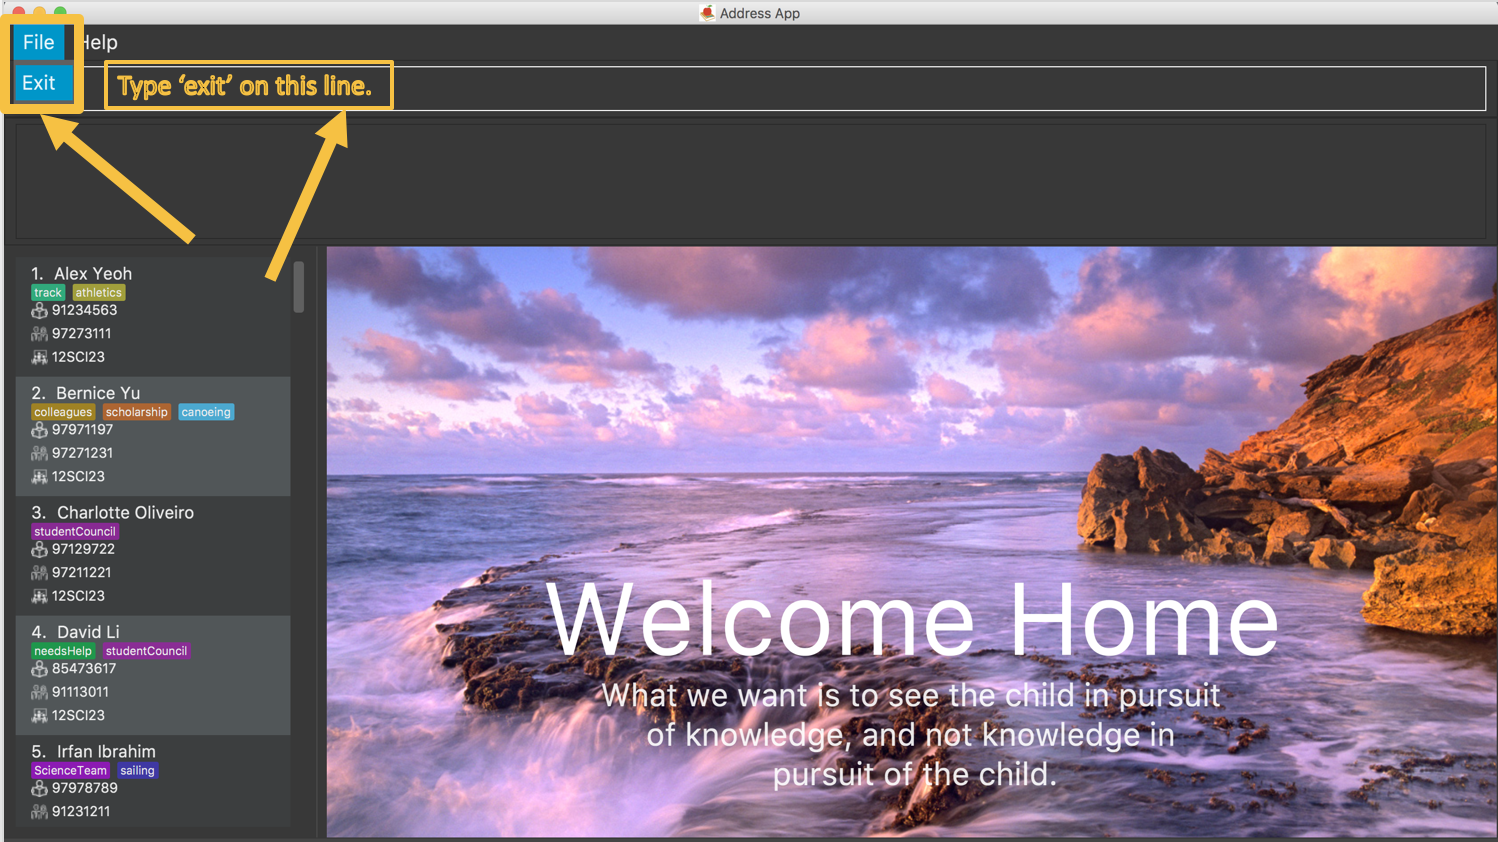
Figure 5.4.5.1 : The two ways you can exit your cherBook
5.4.6. Saving the data Since v1.0
Address book data are saved in the hard disk automatically after any command that changes the data.
There is no need to save manually.
6. Command Shortcuts
Here is a list of shortcuts you can use in cherBook together with some examples.
| Command | ShortHand | Example |
|---|---|---|
help |
NA |
|
add |
|
|
list |
|
|
edit |
|
|
find |
|
|
findtags |
|
|
home |
|
|
delete |
|
|
select |
|
|
sort |
|
|
remark |
|
|
addschedule |
|
|
viewschedule |
|
|
deleteschedule |
|
|
history |
|
|
undo |
|
|
redo |
|
|
clear |
|
|
tab |
NA |
|
exit |
NA |
|
7. FAQ
Q: How do I transfer my data to another Computer?
A: Install the app in the other computer and overwrite the empty data file it creates with the file that contains the data of your previous Address Book folder.
Q: What happens if I do not input fields that are optional?
A: A message will appear beside the optional field name in the extended screen, stating that the field is not recorded.
Q: Will the list of sample students in the cherBook repopulate again everytime I reopen cherBook?
A: No, those sample students are generated only when you use cherBook for the first time to show you how
a populated cherBook looks like, you can remove the list of the sample students immediately using the clear command.
Q: I have accidentally deleted/edited my contact! Am I able to retrieve him/her?
A: There is a undo command where you can revert any accidental changes.
Q: Is internet connectivity required for cherBook?
A: No, you are able to utilise all features of cherBook offline.
Q: Why does clicking on the contacts not changes the home page to the statistic and graph panels?
A: There is a 'soft lock' that can only be unlock when the select command is entered. e.g. select 1. Everything can be done normally after that.
Q: Is there any way I can delete more than one schedule or contact at a time?
A: For now, cherBook does not support deleting more than one schedule or contact, but make sure to keep a lookout for our v2.0 release because these features are currently undergoing development.
Q: What the statistics in the Statistics Panel for?
A: The Statistics Panel calculates the statistics only for the students currently displayed in the Students Panel.
It is automatically updated whenever the any students in the Students Panel are changed.
Q: Where can I ask for more support or drop a feedback?
A: You can drop us an email at cherbook@gmail.com.
8. Glossary
Statistical concepts are explained with examples here:
Percentile
The percentile indicates that a certain percentage falls below that percentile.
For example, if you score in the 25th percentile, then 25% of test takers are below your score.
If you score in the 50th percentile, then 50% of test takers are below your score.
and if you score in the 75th percentile, then 75% of test takers are below your score.
Standard deviation
Standard deviation is a number used to tell how measurements for a group are spread out from the average (mean), or expected value.
A low standard deviation means that most of the numbers are very close to the average.
A high standard deviation means that the numbers are spread out.
Average
Average is the sum of the numbers divided by how many numbers are being averaged.
It is also known as the arithmetic mean.
A low average implies that the class/cohort has underperformed.
A high average implies that the class/cohort has performed above expectations.
9. Patch Notes
9.1. Features Coming in v2.0
In version v2.0, you will be able to:
-
Compare statistics of different groups with the
comparecommand -
Send emails to the students and parents directly from cherBook using the
sendemailcommand
9.2. Features added in v1.5
In version v1.5, you are be able to:
-
View the home page and toggle it using the
homecommand
9.3. Features added in v1.5rc
In version v1.5rc, you are be able to:
-
View your appointments with the
viewschedulecommand -
Delete yor appointments with students with the
deleteschedulecommand -
Switch between the line graph and bar chart with the
tabcommand
9.4. Features added in v1.4
In version v1.4, you are be able to:
-
View the statistics of specific groups of students from the
Statistics Panel -
Have more colors(randomised) for your student’s tags
-
Set up appointments with your students with the
schedulecommand -
Add tab to show students in the same class and same tags respectively.
9.5. Features added in v1.3
In version v1.3, you are be able to:
-
View your students' details from the
Student Details Panel -
View graphs and charts detailing your students' academic progress from the
GraphPanel -
Omit optional fields(student phone number, email, address, postal code and tags) when adding students
9.6. Features added in v1.2
In version v1.2, you are be able to:
-
Sort your students by their names in alphabetical order with the
sortcommand -
Add
Grades,FormClassandRemarksattributes to your students -
Differentiate the multiple phone numbers for each student
9.7. Features added in v1.1
In version v1.1, you are be able to:
-
Search students easily by tags with the
findtagscommand -
Add
PostalCodeattributes to you students -
Add multiple phone numbers for each student
9.8. Features added in v1.0
In version v1.0, users will be able to:
-
Use command shortcuts
-
Back-up their cherBook data
-
Have your students' tags color coded