Project: cherBook
cherBook is a desktop application designed to help teachers monitor students' academic performance and manage their schedules.
My team and I built cherBook as an enhancement to the original Addressbook-level4 by Team SE-EDU.
This project was built as part of the software engineering module CS2103T offered by the School of Computing (SoC) in the National University of Singapore (NUS).
The user interacts with it using a CLI, and it has a GUI created with JavaFX.
It is written in Java, and has about 30 kLoC.
Code contributed: [Functional code] [Test code]
Roles and Responsibilities
-
Role: Team Lead
-
Responsibilities:
-
In charge of Logic Component.
-
Git Expert: Advises the group for git matters.
-
Integration: Versioning of the code, maintaining the code repository, integrating various parts of the software to create a whole.
-
Scheduling: and tracking: Defining, assigning, and tracking project tasks.
-
List of Enhancements Implemented
-
Command aliases for all commands
-
FindTags Command to find students by Tags
-
Statistics Panel Logic and UI
List of Enhancement Proposed
-
Add Compare command to compare statistics of different student groups
-
Add SendEmail command to allow sending emails from the command box
Enhancement Added: Command aliases feature
External behavior
Following the list table of shortcuts below, all commands under the Shorthand column will behave exactly like the full command in the Command column.
Start of Extract [from: User Guide]
Command Shortcuts
Here is a list of shortcuts you can use in cherBook together with some examples.
| Command | ShortHand | Example |
|---|---|---|
help |
NA |
|
add |
|
|
list |
|
|
edit |
|
|
find |
|
|
findtags |
|
|
home |
|
|
delete |
|
|
select |
|
|
sort |
|
|
remark |
|
|
addschedule |
|
|
viewschedule |
|
|
deleteschedule |
|
|
history |
|
|
undo |
|
|
redo |
|
|
clear |
|
|
tab |
NA |
|
exit |
NA |
|
End of Extract
Justification
Being a command line application, there is a need to be able to enter commands quickly and without error. Hence, the usage of shorthand commands for the more verbose full commands are needed. By adding shorthand commands, the number of key presses needed for the user to execute commands is reduced. This also reduces the chance of users misspelling commands.
Command Alias mechanism
The Command Alias mechanism is facilitated by the COMMAND_ALIAS in each Command class and the parseCommand() method in AddressBookParser.
The AddressBookParser is responsible for analyzing command words while each command’s COMMAND_ALIAS stores the command alias to be accepted by the parser.
The aliased added to each command class is implemented like this e.g. FindCommand :
public class FindCommand extends Command {
    public static final String COMMAND_WORD = "find";
    public static final String COMMAND_ALIAS = "f";
    //...... other logic ......
}
Just like how we store each individual command word constant COMMAND_WORD inside each Command class e.g. FindCommand.COMMAND_WORD, DeleteCommand.COMMAND_WORD , a new constant was added for each command alias e.g. FindCommand.COMMAND_ALIAS.
The parseCommand() in AddressBookParser is implemented like this:
 public Command parseCommand(String userInput) throws ParseException {
        final Matcher matcher = BASIC_COMMAND_FORMAT.matcher(userInput.trim());
        if (!matcher.matches()) {
            throw new ParseException(String.format(MESSAGE_INVALID_COMMAND_FORMAT, HelpCommand.MESSAGE_USAGE));
        }

        final String commandWord = matcher.group("commandWord");
        final String arguments = matcher.group("arguments");
        switch (commandWord) {

        case AddCommand.COMMAND_WORD://Fallthrough
        case AddCommand.COMMAND_ALIAS:
            return new AddCommandParser().parse(arguments);
        // ...... more conditions ......
        default:
            throw new ParseException(MESSAGE_UNKNOWN_COMMAND);
        }
    }
When a command alias is detected in the switch statement, it will result in the return statement below it, causing it to behave similarly to its corresponding command word. When a command word is detected, it will fall through and executes the command as per normal.
Design Considerations
Aspect: Where to add the command Aliases
Alternative 1 (current choice): Add the aliases in each Command Class
Pros: More cohesive command classes.
Cons: None.
Alternative 2: Add the aliases in the AddressBookParser.parseCommand(String) method.
Pros: Easier to read code in the AddressBookParser .
Cons: Use of magic numbers/strings means that the code is harder to trace and debug.
End of Extract
Enhancement Added: FindTags feature
Locating persons by tags: findtags Since v1.1
Finds persons whose tags contain all of the given keywords.
Format: findtags KEYWORD [MORE_KEYWORDS]
Shorthand: ft KEYWORD [MORE_KEYWORDS]
| Only one tag can be searched at any one time. |
Examples:
-
findtags friends
Returns any person having the tagfriends -
findtags friends owesMoney
Returns any person having bothfriendsandowesMoneytags -
ft John
Returns any person having the tagfriends -
ft Betsy Tim John
Returns any person having bothfriendsandowesMoneytags
Example:
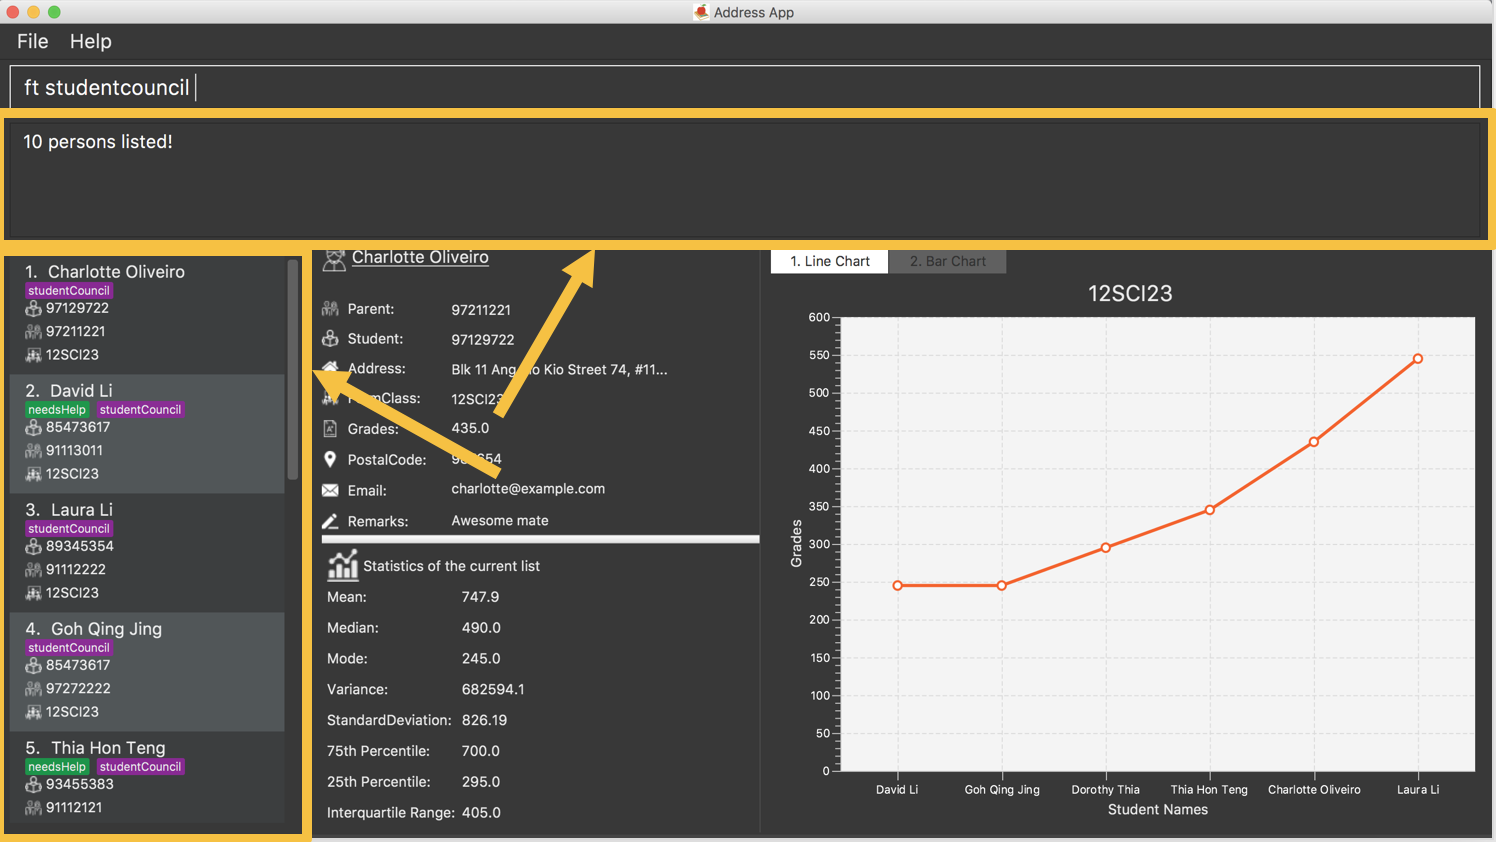
Figure 5.1.7.1 : Find contacts on your cherBook with the specified tags
End of Extract
Justification
As an address book application, there is a need for users to be able to find their contacts quickly and efficiently . Since contacts are also categorised by tags, and there was no way to search by tags, I decided to solve this problem by implementing FindTags.
I decided to use AND search and not OR search for FindTags as it narrows down the contact list by their of tags, making it much more efficient to find people with a specific combination of tags. In this scenario, using OR search for FindTags would not make sense as OR search increases the number of search results as more search terms are used. Thus making it more difficult and less efficient for the user to find the wanted person.
FindTags mechanism
The FindTagsCommand class inheriteds from the Command class.
It allows users to search students by their tags.
The FindTags mechanism is facilitated by the TagsContainKeywordsPredicate, which resides within FindTagsCommand.
The TagsContainKeywordsPredicate tests whether each person’s tags contain all keywords input by the user
and thus supports AND search.
The following sequence diagram shows how the FindTags operation works:
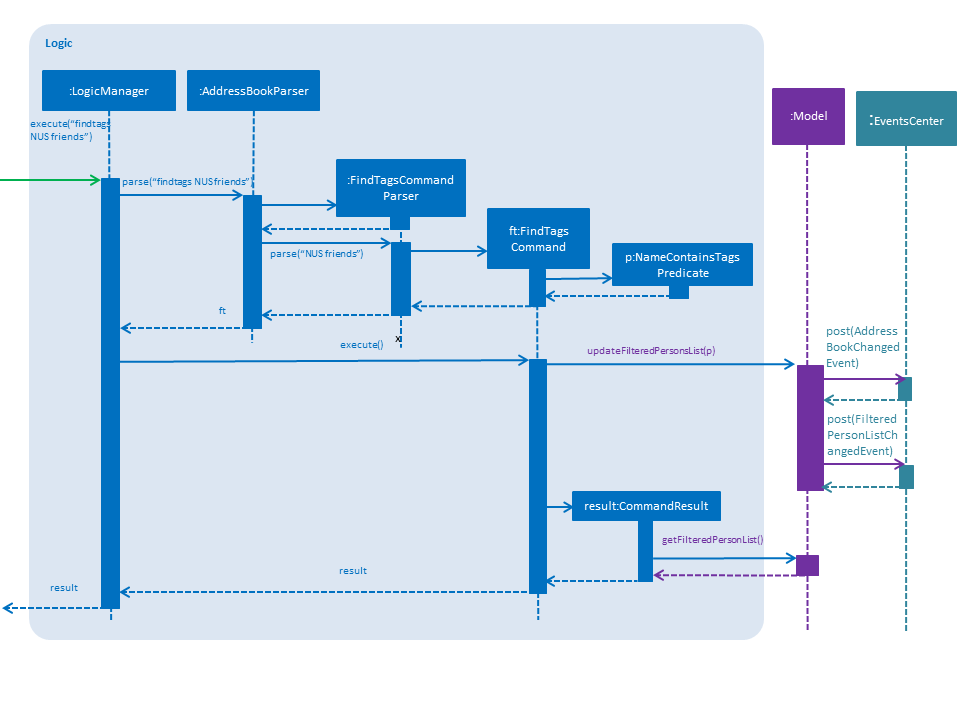
Figure 4.4.1 : Sequence Diagram of FindTags Operation
As can seen from above, when a FindTags command is called, E.g. findtags NUS friends.
An instance of TagsContainKeywordsPredicate is created.
The newly created TagsContainsKeywordsPredicate used to implement FindTagsCommand is shown below:
public class TagsContainsKeywordsPredicate implements Predicate<ReadOnlyPerson> {
    private final List<String> keywords;

    @Override
    public boolean test(ReadOnlyPerson person) {
        return keywords.stream()
                .allMatch(keyword -> StringUtil.containsWordIgnoreCase(person.getTagsAsString(), keyword));
    }
    // ... other logic ...
}
The test is case insensitive as StringUtil.containsWordIgnoreCase() ignores case.
|
This search operation is an AND search
So only persons with at least both friends and NUS will be displayed. Persons with only friends or only NUS will not be displayed. |
Inside the TagsContainKeywordsPredicate, the search terms NUS and friends are stored inside the keywords list.
The overidding test() method evluates whether the person’s tags matches all the search terms in keywords.
This TagsContainKeywordsPredicate is then used to test every person in the AddressBook and filter them.
The newly created FindTagsCommand class is shown below:
public class FindTagsCommand extends Command {
    private final TagsContainsKeywordsPredicate predicate;

    @Override
    public CommandResult execute() {
        model.updateFilteredPersonList(predicate);
        return new CommandResult(
            getMessageForPersonListShownSummary(model.getFilteredPersonList().size()));
    }
    // ... other logic ...
}
The predicate is passed through model.updateFilteredPersonList(predicate) to update the filteredPersonList.
This causes the filteredPersonList to only contain students whose tags match all keywords NUS and friends
and also display them in the PersonListPanel UI element.
However if there are no persons with all keywords in the tags, the PersonListPanel will just be blank.
Meanwhile, the ModelManager posts a AddressBookChanged event and a FilteredPersonListChangedEvent to the EventsCenter.
The AddressBookChangedEvent indicates that the model has changed and the causing the FilteredPersonListChangedEvent updates the StatisticsPanel of the UI to reflect the new Statistics for the new list of students.
This search feature is implemented using Predicate because Predicate help move the business logic to a more central place, helping in unit-testing them separately.
Also, the Predicate can can be reused, improving code manageability and readability.
Design Considerations
Aspect: Have a separate predicate class to support findtags
Alternative 1 (current choice): Have a TagsContainsKeywordsPredicate to facilitate search.
Pros: Easy for new Computer Science undergraduates to understand. They are likely to be the new incoming developers of our project.
Cons: Makes the application more complex to understand according to the More Is More Complex (MIMC) principle. For example, a separate TagsContainsKeywordsPredicate class is needed when the same can be done by inserting it as an inner class in the FindTagsCommand class.
Alternative 2: Create TagsContainsKeywordsPredicate as an inner class in FindTagsCommand class.
Pros: It makes the codebase less complex as there are less classes.
Cons: It adds complexity to the FindTagsCommand source file and reduces re-usability of the Predicate outside of the FindTagsCommand
Aspect: Whether to use AND or OR search
Alternative 1 (current choice): AND search
Pros: Allows users to find students with a specific combination of tags much more efficiently.
E.g. findtags band dance only returns the list of students who have both the band and dance tag rather all students with either the band or dance tag.
Cons: Does not allow users to calculate statistics for more than one group of students at a time.
E.g. findtags band dance cannot calculate statistics for the track and dance groups combined.
Alternative 2: OR search
Pros: Allows users to calculate statistics for more than one group of students at a time.
E.g. findtags track dance calculates statistics for the track and dance groups combined.
Cons: Or search does not help teachers find students with a specific combination of tags efficiently.
E.g. findtags track dance does not narrow down the list of students returned to students who have both the track and dance tag.
End of Extract
Enhancement Added: Statistics Panel feature
Statistics Panel Since v1.4
cherBook uses the Statistics Panel to display the relevant statistics for the current list of students in the Students Panel.
The statistics changes automatically when there is a change to the list of students in the Students Panel.
E.g. When you enter the command findtags studentCouncil, the Students Panel will only show students with the studentcouncil tag and Statistics Panel will then show statistics for students with the studentcouncil tag.
You can use these statistics to pick out trends in your student’s grades and also monitor how well they are coping with their studies.
End of Extract
Justification
The StatisticsPanel is needed to display the statistics of the students currently in the Students Panel.
The statistics provided helps teachers monitor their student’s academics and identify the weaker students that need more help.
Statistics Panel mechanism
The StatisticsPanel class inherits from the UiPart class.
It displays to users the statistics of the current list of students in the StudentsPanel element of the user interface.
The Statistics Panel is implemented using the Statistics class and The FilteredPersonListChangedEvent event.
The Statistics class supports the calculating of statistics for the current list of students in the PersonListPanel and
the FilteredPersonListChangedEvent indicates that the FilteredPersonList in the model has changed and is used to update the Statsistics Panel.
The following activity diagram shows how the StatisticsPanel mechanism works:
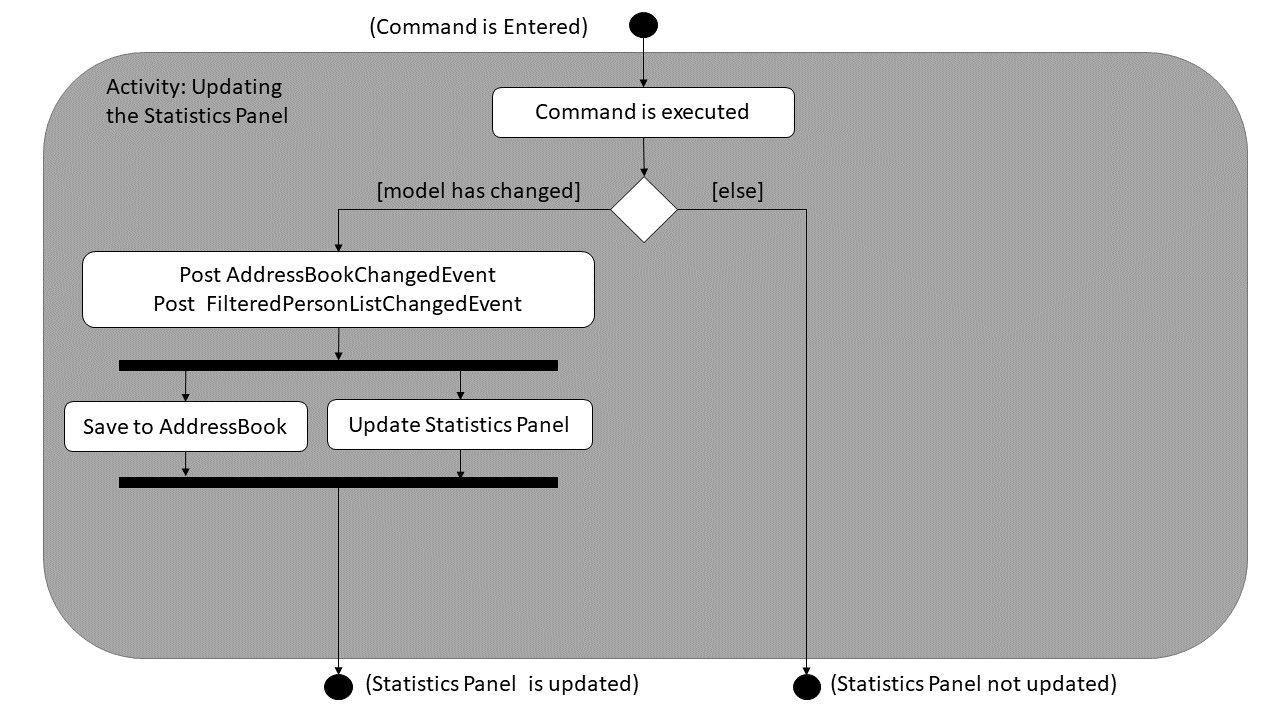
Figure 4.12.1 : Activity Diagram of updating the`Statistics Panel` .
Whenever the user enters any Command that modifies the addressBook data, the Model Component posts
a FilteredPersonListChangedEvent containing the filteredPersonsList to the EventsCenter.
At the same time, an AddressBookChangedEvent that indicates that the model has changed is also posted to the EventsCenter.
The FilteredPersonListChangedEvent is implemented this way:
public class FilteredPersonListChangedEvent extends BaseEvent {

    private final ObservableList<ReadOnlyPerson> currentFilteredList;

    public FilteredPersonListChangedEvent(ObservableList<ReadOnlyPerson> currentFilteredList) {
        this.currentFilteredList = currentFilteredList;
    }

    @Override
    public String toString() {
        return this.getClass().getSimpleName();
    }

    public ObservableList<ReadOnlyPerson> getCurrentFilteredPersonList() {
        return currentFilteredList;
    }
}
Meanwhile in the StatisticsPanel class, the handleFilteredPersonListChangedEvent event handler which is subscribed to EventsCenter handles the FilteredPersonListChangedEvent event.
The handleFilteredPersonListChangedEvent event handler is implemented this way:
    @FXML
    @Subscribe
    private void handleFilteredPersonListChangedEvent(FilteredPersonListChangedEvent event) {
        logger.info(LogsCenter.getEventHandlingLogMessage(event));
        statistics.initScore(event.getCurrentFilteredPersonList()); // Updates the statistics instance values
        loadListStatistics();
    }
When handling the event, the Statistics instance in StatisticsPanel has its values updated by the initScore() method.
This means that the values returned from the Statistics class’s getter methods when called are now updated.
The loadListStatistics() method in StatisticsPanel is then called.
The loadListStatistics() is implemented this way:
    /**
    * Updates list Statistics in the Statistics panel
    */
    protected void loadListStatistics() {
        mean.setText(statistics.getMeanString());
        median.setText(statistics.getMedianString());
        mode.setText(statistics.getModeString());
        variance.setText(statistics.getVarianceString());
        standardDeviation.setText(statistics.getStdDevString());
        quartile1.setText(statistics.getQuartile1String());
        quartile3.setText(statistics.getQuartile3String());
        interquartileRange.setText(statistics.getInterquartileRangeString());
    }
The Labels (texts) in the User Interface are set according to the updated Statistics instance’s getter methods.
This updates and shows the statistic values of the current filteredPersonList on the StatisticsPanel in the User Interface.
At the same time, the AddressBookChangedEvent is also being handled, saving the addressBook data.
Design Considerations
Aspect: How to update the Statistics Panel
Alternative 1 (current choice): Create a new FilteredPersonListChangedEvent just for updating the Statistics Panel.
Pros: Adherence to the Single Responsibility Principle (SRP) increases cohesion among the different Events and reduces coupling.
Cons: Increases the number of classes in the source code, making it more complex according to the More Is More Complex (MIMC) principle.
Alternative 2: Modify AddressBookChangedEvent to also update the Statistics Panel.
Pros: Since a change in the model triggers both the AddressBookChangedEvent and the updating of the Statistics Panel,
only a few changes to are needed for AddressBookChangedEvent to do also update the Statistics Panel.
Cons: This violates the Single Responsibility Principle (SRP) by having giving AddressBookChangedEvent the additional responsibility of updating the Statistics Panel.
Aspect: How to raise the FilteredPersonListChangedEvent in the ModelManager
Alternative 1 (current choice): Create a separate updateStatisticsPanel() method to raise the event to update the Statistics Panel
Pros: Reduces coupling and increases cohesion by giving a single responsibility to the updateStatisticsPanel() method.
Cons: Makes the application more complex to understand according to the More Is More Complex (MIMC) principle.
Alternative 2: Raise the FilteredPersonListChangedEvent together with the AddressBookChangedEvent
Pros: Reduces the number of similar methods in the source code, making it less complex and easier to understand
Cons: Increases coupling in the source code
End of Extract
Enhancement Proposed: Add command compare
External behavior
Teh user can enter the compare command followed by 2 Tags or FormClassNames to compare statistics of different groups with the compare command.
The Statistics Panel will have a second set of values for the second group of students.
The difference in the 2 sets of values will be displayed on the right of the StatisticsPanel.
The difference will be colored red if the difference is negative and geen if the difference is positive to to make it noticeable and more visually appealing.
Justification
Teachers often have to compare the grades of students or groups of students to analyse their academic progress.
As the simple statistics can only tell you so much about your data, there is a need for more powerful data analytics.
The comapre command gives teachers a more powerful tool to analyse data by allowing them to compare different sets of data .
The color coded difference values also improve the readability of the statistics so that teachers can get a good idea of the relative performance of two groups of students at a glance.
Enhancement Proposed: Add command sendemail
External behavior
The user can enter the sendemail command followed by the INDEX of the intended recepient and an external email application with the FROM and TO fields already populated.
This streamlines the process of teachers sending emails to students and parents and allows them to do it directly from within cherBook.
Justification
It is troublesome for teachers to manually and repeatedly open up their browsers to send emails to students of their parents.
The sendemail command removes this process and streamlines the process by bringing the teacher straight to the compose email page with the relevant fields already filled, removing the trouble of going through a browser.
Other contributions
-
Added Travis, AppVeyor and Coveralls on the cherBook repository automated deployment and testing. (Pull Request #7, #152)
-
Added Grades and FormClass attributes to the Student (Pull Requests #39, #41)
-
Populated cherBook with a significant amount (40 student contacts) of realistic data (Pull Request #73)
-
Cleaned up unnecessary nesting in the ExtendedPersonCard UI element (Commit 1a6bc45 in Pull Request #98)
-
Cleaned up code smells in the whole repository (Pull Request #123)
Project: NUShortcuts
NUShortcuts is a web application to provide walking shortcuts around NUS with step by step picture guides .
This was done from May 2017 to Aug 2017 for CP2106 - Orbital Programme offered by the School of Computing (SoC) in the National University of Singapore (NUS).
This web application was built using the MeteorJS framework and is deployed on a Heroku server.
NUShortcuts offers three route types: Fastest route, Sheltered route and Least Stairs route.
Users can search for their destination in NUS, choose their desired path and follow the picture guides to their destination.
For better travel time estimates, they can indicate their mode of transport and their estimated walking speeds under the settings page.
My team also implemented a ranking system to track the most popular and frequently searched locations.
One of the biggest features I implemented was the algorithm behind the calculation of the shortest paths around NUS.
Some of the other features I implemented include the feedback page where users can give feedback on how to improve NUShortcuts.