Introduction
In this project portfolio, the external and internal behavior of the various features of cherBook, along with the motivations
behind implementing them, will be explained thoroughly.
cherBook is an address book application that combines statistical analysis with the ease of communication.
It is targeted at teachers as it offers various features that can improve their lives.
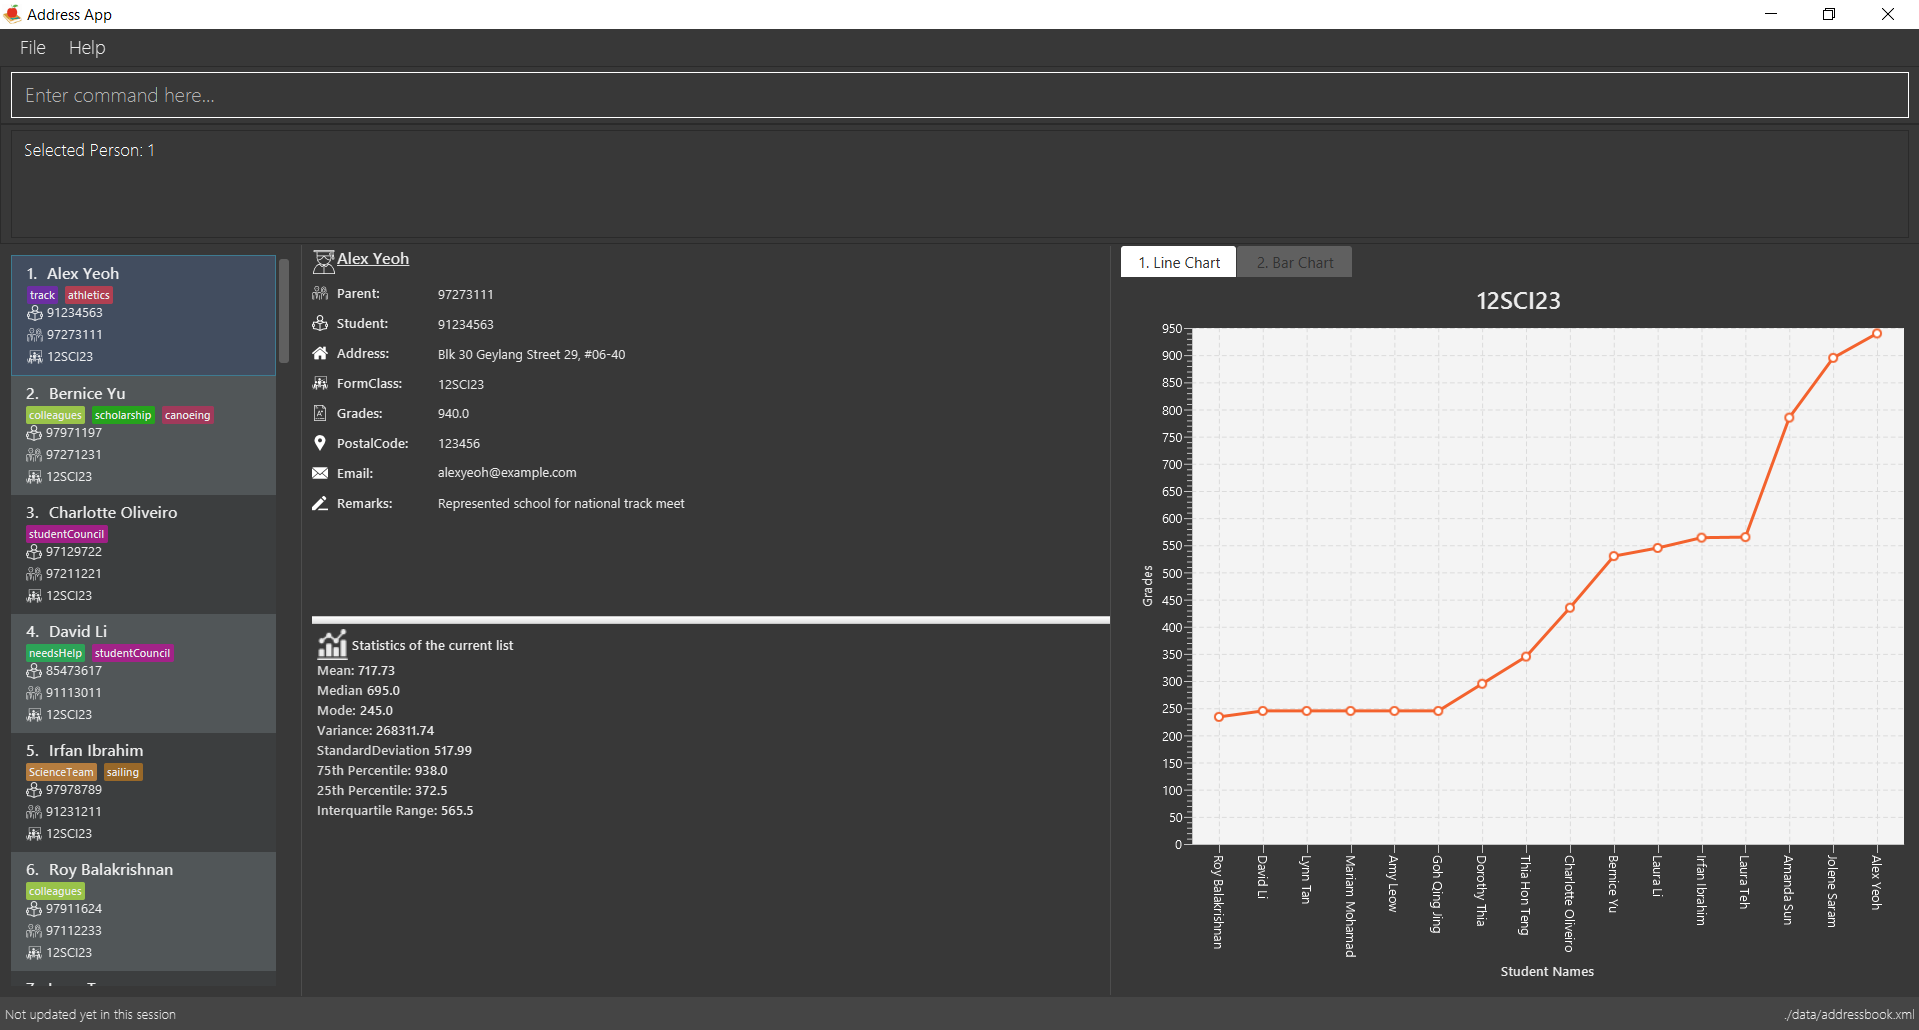
Figure 1.1 : Illustration of cherBook
The user can interact with it using a command line interface, and it has a graphical user interface created with JavaFX.
The application is written in Java.
Code contributed: [Functional code] [Test code]
Enhancement Added: Randomised Unique Tag Colors
Randomised Unique Tag Colors: Since v1.4
For your convenience, all assignment of colors will be automated by cherBook for you.
Whenever you access the cherBook, a new range of random colors will be assigned to the background of the tags.
Modifications were made to the range of possible colors. It is to ensure that the background color’s saturation and lumination is at an optimal level
to match with the white font of the tag description. Thus, allowing you to be able to see the tag description clearly as seen in the following picture.

Figure 5.3.5.1 : Example of color tags
End of Extract
Justification
In this day and age, educators have many classes of students to teach. They will have difficulty differentiating between tags of different descriptions, if they are to tag many of their students.
This feature will assign tags of the same descriptions with a unique color. With the implementation of this feature, educators will be able to distinguish between the different tags easily.
Unique Color Tag mechanism
The unique color tag mechanism is facilitated by making changes to PersonCard class in the UI component. This feature enables
the assignment of unique colors to tags.
The color generated to be assigned to tags is random and all tags with the same description will be assigned a same color.
The following sequence diagram shows how the unique color tag operation works:
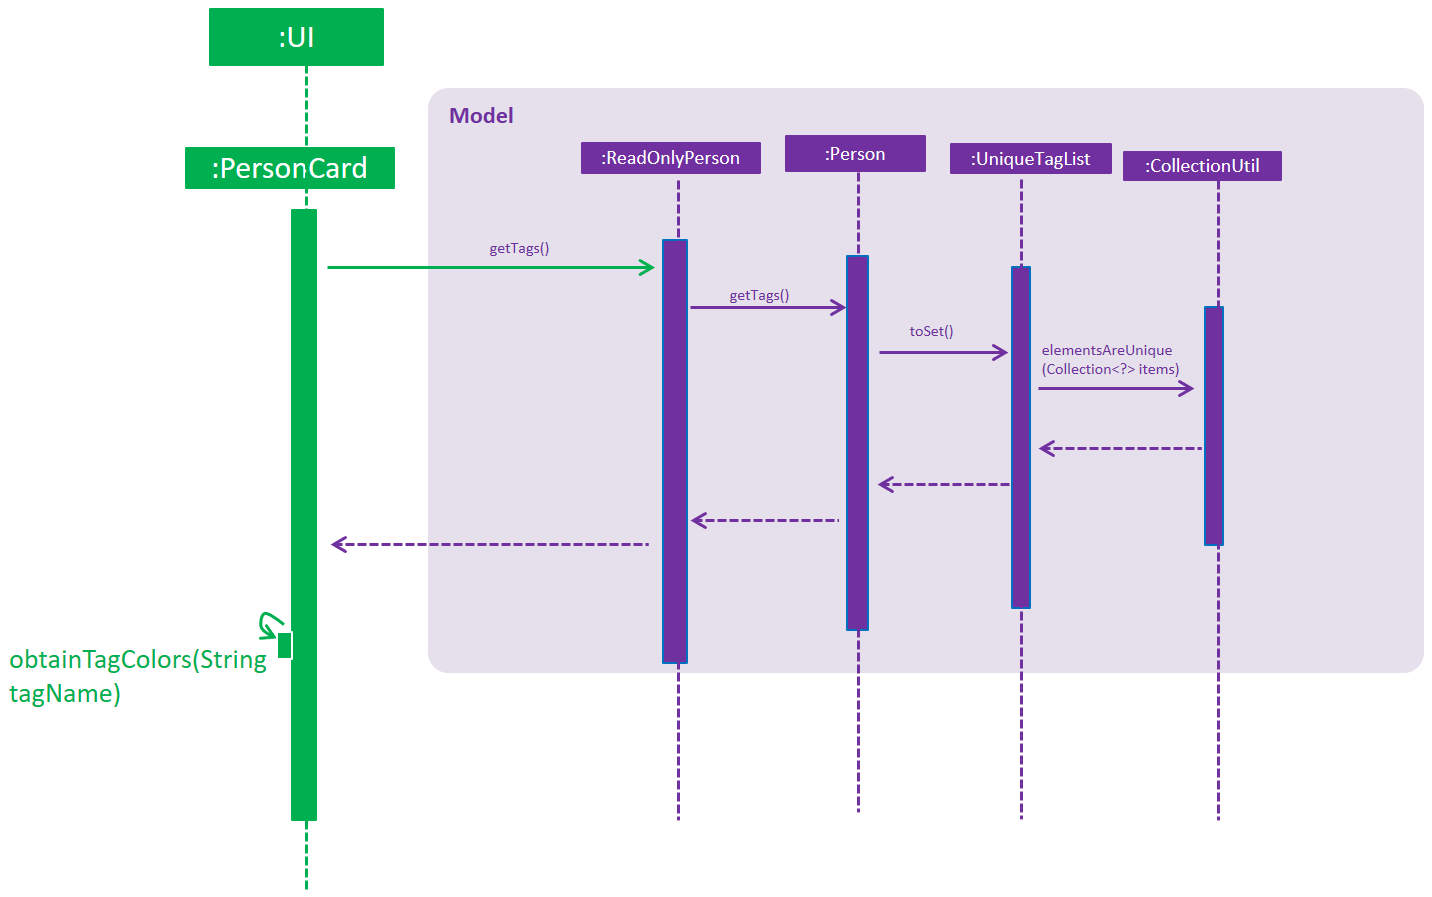
Figure 4.13.1 : Sequence Diagram of Unique Color Tag Operation
The method receives String tagName (description of the tag) and returns the String assignedColor
associated to the tagName. It is shown in the code segment below.
public static String obtainTagColors(String tagName) {
        if (!currentTagColors.containsKey(tagName)) {
            do {
                Random random = new Random();
                final float hue = random.nextFloat();
                final float saturation = 0.65f + random.nextFloat()
                        * (0.90f - 0.65f);
                final float luminance = 0.60f + random.nextFloat()
                        * (0.90f - 0.60f);

                Color color = Color.getHSBColor(hue, saturation, luminance);

                Formatter hexRepresentation = new Formatter(new StringBuffer("#"));
                hexRepresentation.format("%02X", color.getRed());
                hexRepresentation.format("%02X", color.getGreen());
                hexRepresentation.format("%02X", color.getBlue());
                assignedColor = hexRepresentation.toString();
            } while (usedColors.contains(assignedColor));

            usedColors.add(assignedColor);
            currentTagColors.put(tagName, assignedColor);
        }
        return currentTagColors.get(tagName);
    }
The section below explains how various parts of the above code segment works.
A color is determined by three factors, hue, saturation and luminance.
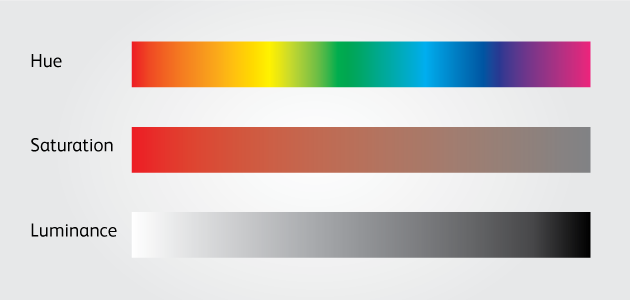
Figure 4.13.2 : Color Range of Hue, Saturation and Luminance
The code segment shown below randomises the value of each of the three factors,
and a random color is obtained.
Random random = new Random();

final float hue = random.nextFloat();
final float saturation = 0.65f + random.nextFloat() * (0.90f - 0.65f);
final float luminance = 0.60f + random.nextFloat() * (0.90f - 0.60f);

Color color = Color.getHSBColor(hue, saturation, luminance);
Random range of saturation and luminance are tweaked to ensure that the random color generated will always mesh well with the white font of
the tag description.
|
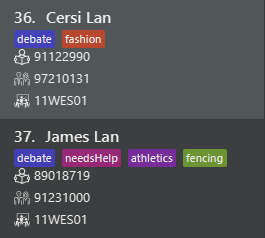
Figure 4.13.3 : Compatibility of tag color background with white font of tag description
Next, in the code segment below, the red, green and blue components are extracted from the color. It is then formatted into a hexadecimal
representation of the color, before being converted to a String data type and assigned to assignedColor.
| Hexadecimal representation of the color is compatible with JavaFx. |
Formatter hexRepresentation = new Formatter(new StringBuffer("#"));
hexRepresentation.format("%02X", color.getRed());
hexRepresentation.format("%02X", color.getGreen());
hexRepresentation.format("%02X", color.getBlue());
assignedColor = hexRepresentation.toString();
The assignedColor is added into an ArrayList<String> usedColors. This ensures no same color will be assigned
to a tag with different description in subsequent iterations by randomising a different color again, should a same color is
generated. The method will then return assignedColor.
Lastly, in the code below, obtainTagColors(tag.tagName), the hexadecimal String representation of the color, will be appended
to the tag background color. This sets the background color of the tag to be that of the assigned color.
private void initialiseTags(ReadOnlyPerson person) {
        person.getTags().forEach(tag -> {
            Label tagLabel = new Label(tag.tagName);

            tagLabel.setStyle("-fx-background-color: " + obtainTagColors(tag.tagName));
            tags.getChildren().add(tagLabel);
        });
    }
Design Considerations
Aspect: How tag colors are assigned.
Alternative 1 (current choice): Tag colors are assigned randomly.
Pros: Easy for developers to understand the mechanism of this feature.
Cons: User has no control over the assigning of tag colors.
Alternative 2: Tag colors are assigned by the user.
Pros: User will have more freedom in personalising the tags.
Cons: The range of colors will be more limited.
End of Extract
Enhancement Added: Optional Inputs/Fields
External behavior
Start of Extract [from: User Guide]
Optional fields for adding a person Since v1.3
You can find a list of optional input fields for the add command in the table below.
|
When you do not enter any of the optional fields, a message will be generated to inform you that the particular field is not recorded. |
| Optional Field | Prefix | Example of user’s input in cherBook’s command box without the optional field |
|---|---|---|
Student Phone Number |
p/ |
add n/John pp/97272700 e/John@gmail.com a/Johnny street, block 321, #01-01 f/6C g/91 c/600321 t/Smart |
Address |
a/ |
add n/John p/97602611 pp/97272700 e/John@gmail.com f/6C g/91 c/600321 t/Smart |
Postal Code |
c/ |
add n/John p/97602611 pp/97272700 e/John@gmail.com a/Johnny street, block 321, #01-01 f/6C g/91 t/Smart |
e/ |
add n/John p/97602611 pp/97272700 a/Johnny street, block 321, #01-01 f/6C g/91 c/600321 t/Smart |
|
Tag |
t/ |
add n/John p/97602611 pp/97272700 e/John@gmail.com a/Johnny street, block 321, #01-01 f/6C g/91 c/600321 |
Example:
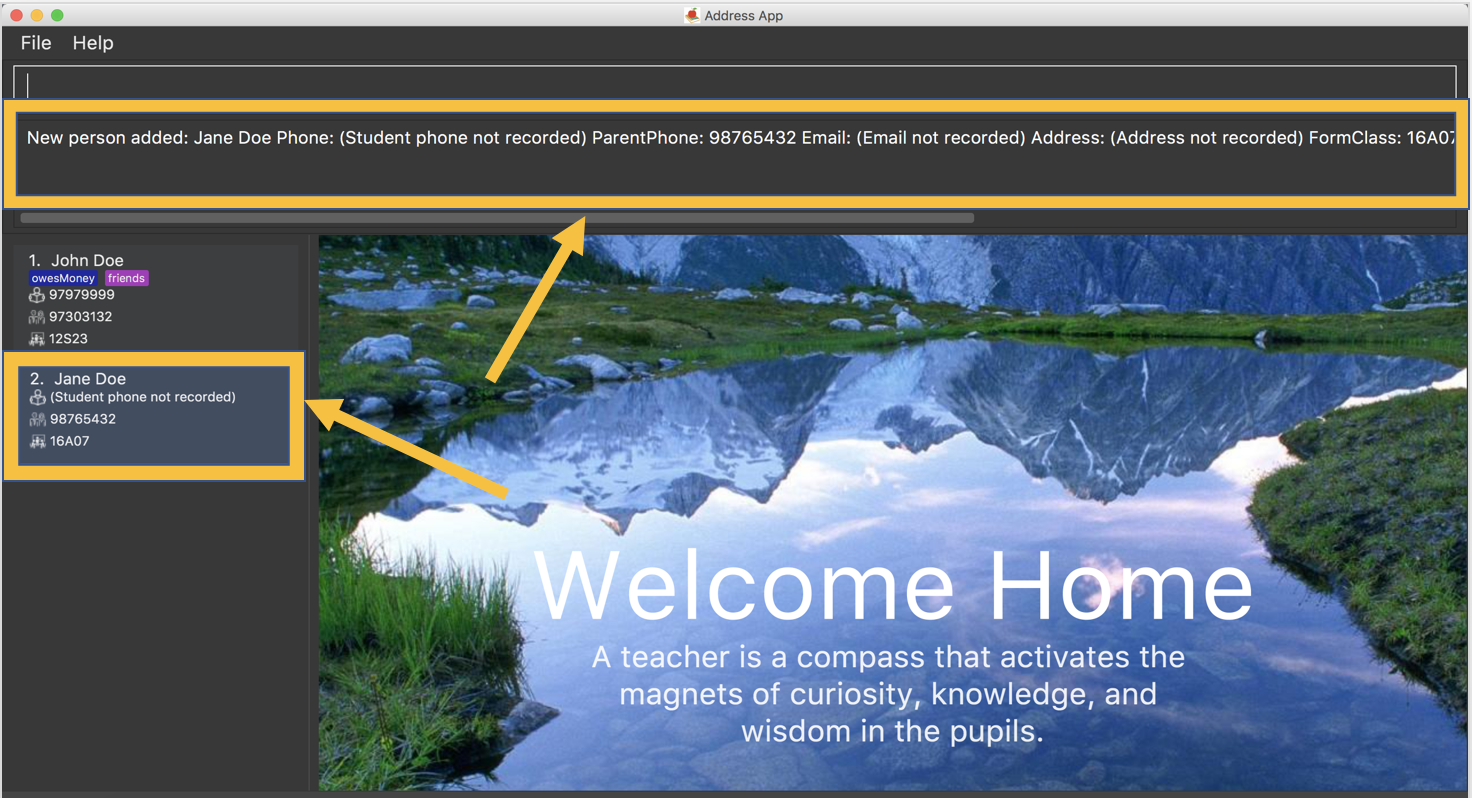
Figure 5.1.1.2 : Displays optional inputs for your contacts
End of Extract
Justification
As we increased the number of attributes for the person who is being added into the address book, we realised that it is getting very cumbersome for the user to input all the compulsory attributes into cherBook. Furthermore, the person to be added might not have all the attributes deemed compulsory.
Thus, we decided that several non essential attributes can be optional inputs for the user.
Optional Inputs/Fields mechanism
The optional inputs/fields mechanism is facilitated by making changes to AddCommandParser class in the Logic component.
This feature enables several input/fields of the student to be optional.
| Student’s phone number, email, address and postal code are optional inputs/fields. |
The following sequence diagram shows you how the optional inputs/fields operation works:
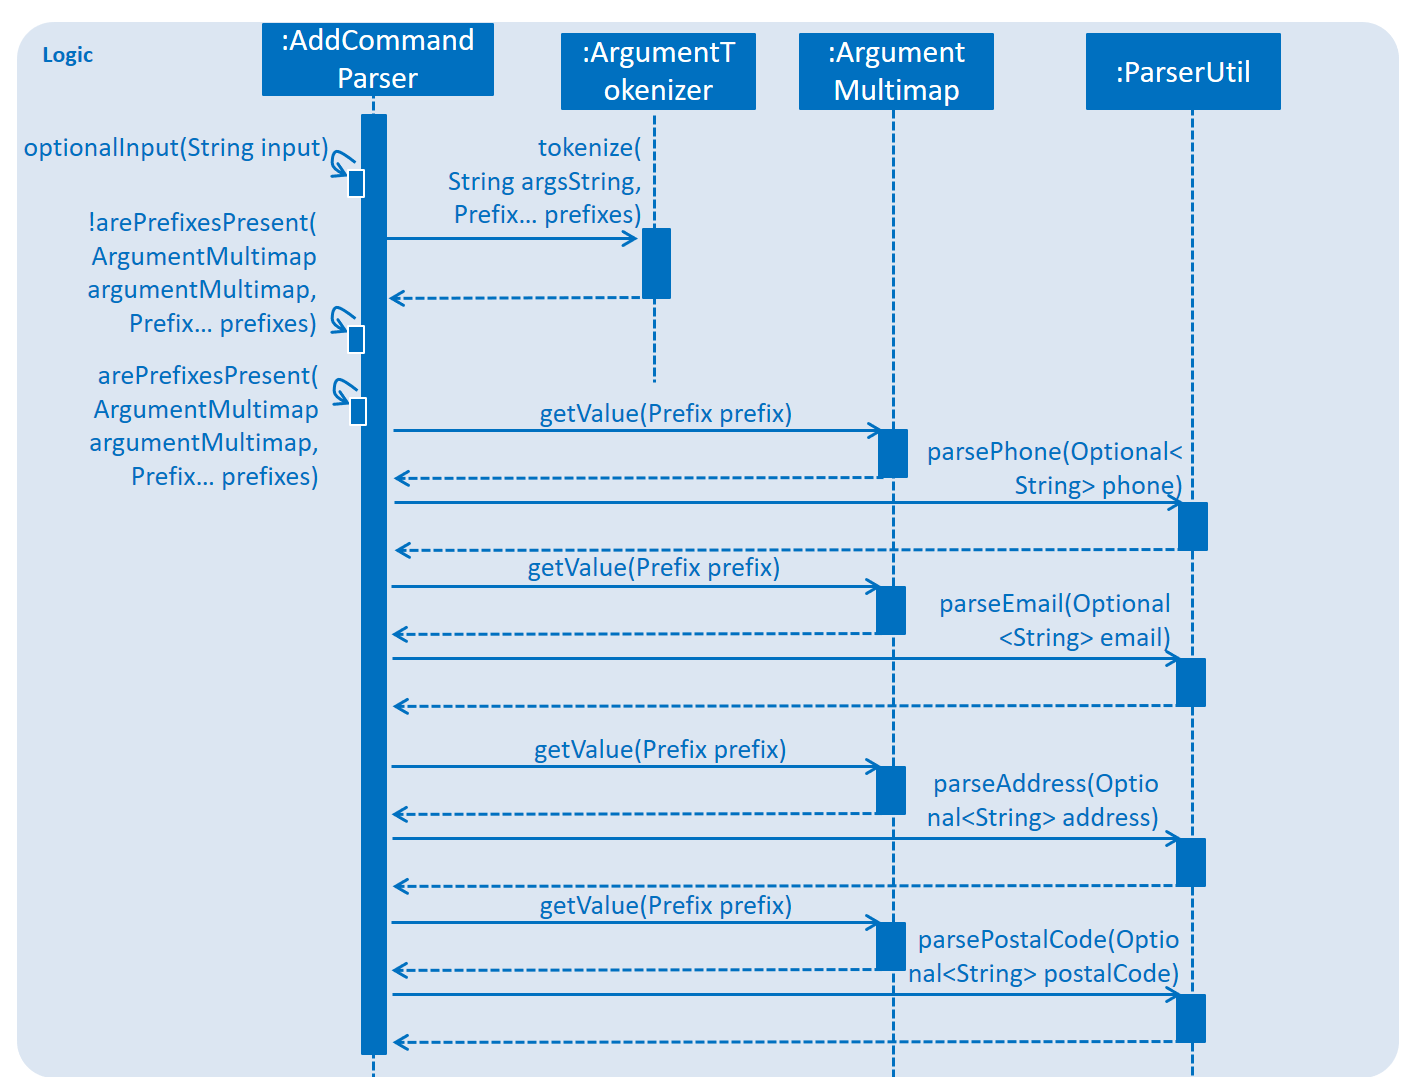
Figure 4.2.1 : Sequence Diagram of Optional Inputs/Fields Operation
The optionalInput method will append messages indicating that those optional fields are not recorded if the user chooses not to include those fields. The method can be seen in the code section below.
    public static String optionalInput(String input) {
        if (!input.contains("a/")) {
            input = input + " a/ (Address not recorded)";
        }
        if (!input.contains("e/")) {
            input = input + " e/ (Email not recorded)";
        }
        if (!input.contains("c/")) {
            input = input + " c/ (Postal code not recorded)";
        }
        if (!input.contains(" p/")) {
            input = input + " p/ (Student phone not recorded)";
        }
        return input;
    }
The output of the method is illustrated in the following picture.
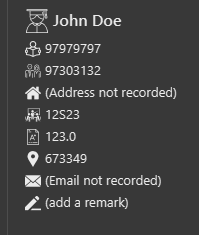
Figure 4.2.2 : Messages shown when the user does not enter the optional fields
Prefixes of the optional fields - PREFIX_PHONE, PREFIX_EMAIL, PREFIX_ADDRESS and PREFIX_POSTALCODE are removed from
the code segment below. The ensures that the ParseException will not be thrown if the user chooses not to include the
optional fields.
if (!arePrefixesPresent(argMultimap, PREFIX_NAME, PREFIX_PHONE, PREFIX_PARENTPHONE, PREFIX_FORMCLASS,
                PREFIX_GRADES)) {
            throw new ParseException(String.format(MESSAGE_INVALID_COMMAND_FORMAT, AddCommand.MESSAGE_USAGE));
        }
Design Considerations
Aspect: Implementation of optional fields/inputs.
Alternative 1 (current choice): This feature manipulates the input to include the missing optional input prefix, along with a message
stating that the field is not recorded.
Pros: Simpler to understand and tweak this feature as it only manipulates the parsed input of the user.
Cons: Unable to implement UI features that requires the attribute to have a optional property.
Alternative 2: This feature implements a optional characteristic in optional attributes.
Pros: Optionality aspect of the attributes can be used by other features of cherBook.
Cons: Harder to understand the mechanism and more work is required implement changes to this feature.
End of Extract
Removed Enhancement: Multiple Numbers (Parent and Student number)
External behavior
Note that this is not an extract from the userguide as this particular section is removed from the userguide.
Adding multiple numbers to a person: add Since v1.3
|
Adding of student or/and parent’s number must be preceded by the phone prefix |
You can add multiple numbers to a person by adhering to the format below.
Format: add n/NAME p/student/ STUDENTNUMBER parent/ PARENTNUMBER [e/EMAIL] [a/ADDRESS] f/FORMCLASS g/GRADES [c/POSTALCODE] [t/TAG]…
Shorthand: a n/NAME p/student/ STUDENTNUMBER parent/ PARENTNUMBER [e/EMAIL] [a/ADDRESS] f/FORMCLASS g/GRADES [c/POSTALCODE] [t/TAG]…
Example:
-
add n/Alex Yeoh
p/student/97272031 parent/97979797e/alexyeoh@example.com a/Blk 30 Geylang Street 29, #06-40 f/6E1 g/123.0
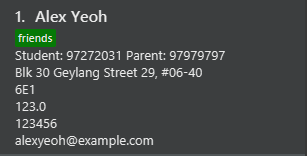
Figure 4.5.2 : Valid Displayed Person Card Phone Information
Justification
Initially, cherBook had the option of only being able to record the student’s number. We decided to come out with multiple numbers (Parent and Student number) as many educators believe that there needs to be good communication between not only the students, but their parents too.
This enhancement is especially useful for those who are in charge of younger students in primary school. Educators in institutions with younger students will find having parents numbers more important than the student’s number, as there tends to be more communication between the teachers and the parents of the students.
Add Student/Parent Phone Contact mechanism [Functional code]
The student/parent phone contact mechanism is facilitated by making changes
to the Phone class in the model component. It enables the input
of the phone contact information of the student and his/her parent.
To ensure consistency across the user inputs for add command, the user will have to input p/ student/(STUDENT_NUMBER) parent/(PARENT_NUMBER) instead of p/ Student: (STUDENT_NUMBER) Parent: (PARENT_NUMBER).
The following sequence diagram shows how the student/parent phone contact operation works:
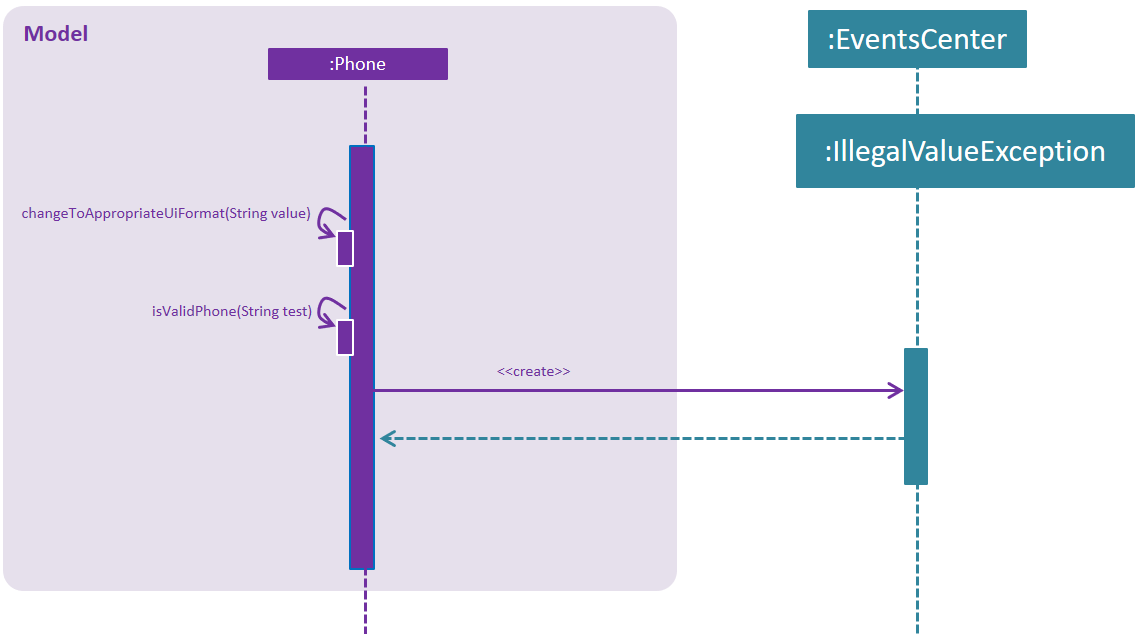
Figure 5.1.1 : Sequence Diagram of Student/Parent Phone Contact Operation
The following method replaces / with :, s with S, and p with P in the user input string
for appropriate presentation of displayed person card phone information:
public static String changeToAppropriateUiFormat(String value) {
        value = value.replace("/", ": ");
        value = value.replace("s", "S");
        value = value.replace("p", "P");
        return value;
    }
Validity of the displayed person card phone information is checked in the following method in the Phone class:
public static boolean isValidPhone(String test) {
        return test.matches(PHONE_VALIDATION_REGEX);
    }
where the PHONE_VALIDATION_REGEX refers to:
public static final String PHONE_VALIDATION_REGEX =
"((Student: )(\d\d\d\d\d\d\d\d)( Parent: )(\d\d\d\d\d\d\d\d))|((Parent: )(\d\d\d\d\d\d\d\d))";
The regex ensures that the string for displayed person card phone information adheres to the
correct format of Student: (STUDENT_NUMBER) Parent: (PARENT_NUMBER) or Parent: (PARENT_NUMBER) as it is optional to
add the phone number of students.
The phone numbers must be exactly 8 digits long.
Figure 5.1.2 : Valid Displayed Person Card Phone Information
If the string format for displayed person card phone information is valid, the
phone contact information of the student and his/her parent will be displayed
below the student’s name in the person card as seen in the figure above.

Figure 5.1.3 : Message to prompt Users to Enter Correct Phone Format
If the string format for displayed person card phone information is invalid, an IllegalValueException
is thrown. The user will be prompted to follow the accepted format as seen in the figure above.
public Phone(String phone) throws IllegalValueException {
        requireNonNull(phone);
        String trimmedPhone = phone.trim();
        trimmedPhone = changeToAppropriateUiFormat(trimmedPhone);
        if (!isValidPhone(trimmedPhone)) {
            throw new IllegalValueException(MESSAGE_PHONE_CONSTRAINTS);
        }
        this.value = trimmedPhone;
    }
Design Considerations
Aspect: Phone numbers
Alternative 1 (current choice): Both the student’s phone number and their parent’s phone number is a single string.
Pros: Easy to implement as separate classes for student’s phone and parent’s phone is not required.
Cons: Harder to implement features that require solely the student’s number or parent’s number.
Alternative 2: Have a phoneStudent class for student’s phone number and phoneParent class for parent’s phone number.
Pros: Can edit properties of the student’s phone number or parent’s phone number separately.
Cons: Harder to implement as now there will be two phone classes instead of one.
Aspect: Validity of phone number
Alternative 1 (current choice): Only allow numbers that are exactly 8 digits long.
Pros: Ensures consistency across all phone numbers.
Cons: Student’s parents might not have foreign numbers that are not exactly 8 digits long.
Alternative 2: Modify phone validity regex to allow any length of phone numbers.
Pros: Able to have phone numbers that are local or non-local.
Cons: Inconsistent phone lengths displayed, might look very messy.
End of Extract
Other contributions
-
Included ParentPhone attribute (Pull request #116)
-
Included icons in PersonListCard (Pull request #116)
-
Icon text descriptors in ExtendedPersonCard on startup of cherBook (Pull request #121)
-
Improved test quality of several features (Pull requests #88 , #113, #121)
-
Removed unused codes to improve coveralls (Pull request #129)
-
Updated AboutUs section (Pull request #25)
-
Created Glossary section in DeveloperGuide (Pull request #16)
Other Projects: NUS Interactive Food Map
It is an interactive food map of the NUS campus that shows information of major food places in the NUS map.